Showcasing a video on your site’s front page is essential for boosting traffic and engagement. Almost 58% of businesses use a video on their homepage. It’s the best way to grab the attention of site visitors as soon as they land on your site’s home page.
In this article, we’ll describe four easy methods of how to add a video background in WordPress.
Table of Contents
- 4 Methods to Add a Video Background in WordPress
- Best Practices for Adding a WordPress Video Background
- Elements to Include in a Homepage Video Background
- Advantages of Using Video Backgrounds in WordPress
- Successful Video Background Examples
4 Methods to Add a Video Background in WordPress
Several methods allow you to add video backgrounds to your WordPress website. However, before this, you must find and upload your video on your website or a third-party platform.
You can use your own video or download one from a free stock video platform. Once you choose your video, there are several options to upload it and get a link that you will further use:
- Self-hosted: You upload the background videos directly to your WordPress website in the Media section.
- YouTube/Vimeo videos: You upload the video on YouTube/Vimeo and get a direct link to it.
Now that you have your video, you can add it to your website using one of the following methods:
- Use a WordPress theme with built-in video features
- Use the Cover block
- Use video background plugins
- Use a page builder
Let’s analyze each option in detail.
1. Use a Video WordPress Theme
Some video WordPress themes include built-in video background options, making the experience of impressing your website visitors even easier.
An example of such a theme is Inspiro Lite, a free theme great for portfolios and business websites.
To add a background In Inspiro Lite:
- Go to Appearance > Customize > Homepage Hero Area > Media.
- You can choose the video from the Media library or add a link from YouTube or Vimeo.
- Once you’ve added your video, you can preview it directly in the customizer.
- Click the Publish button, and the video background will appear on your website’s homepage.

Some premium themes like Inspiro PRO include advanced options for video backgrounds. For starters, it allows adding more than one video in the homepage hero area. It also provides video background customization options such as loop, mute, autoplay, player controls, and others.
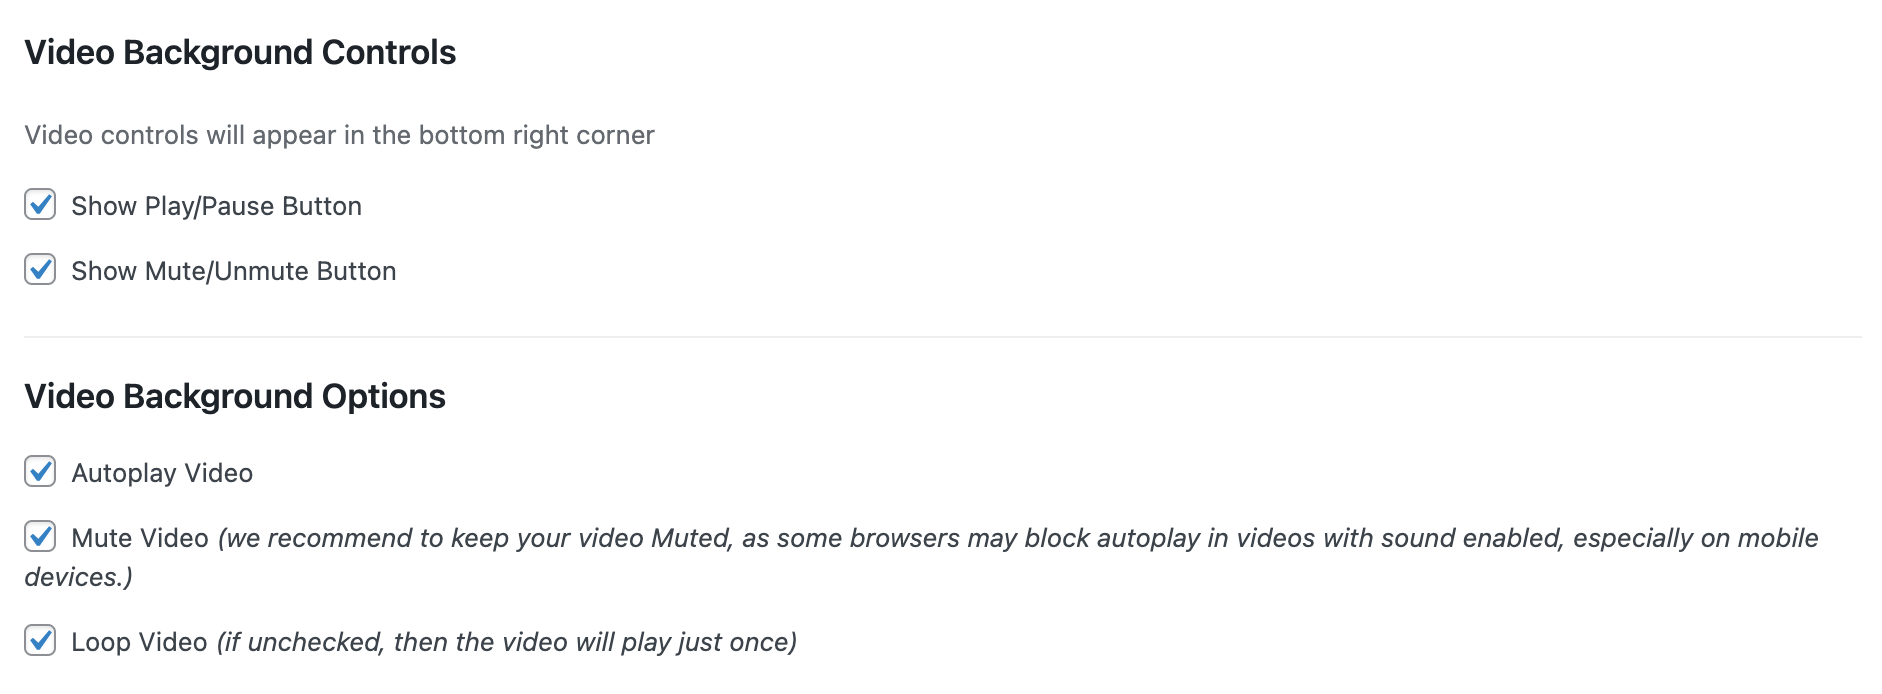
To add a video background in Inspiro PRO:
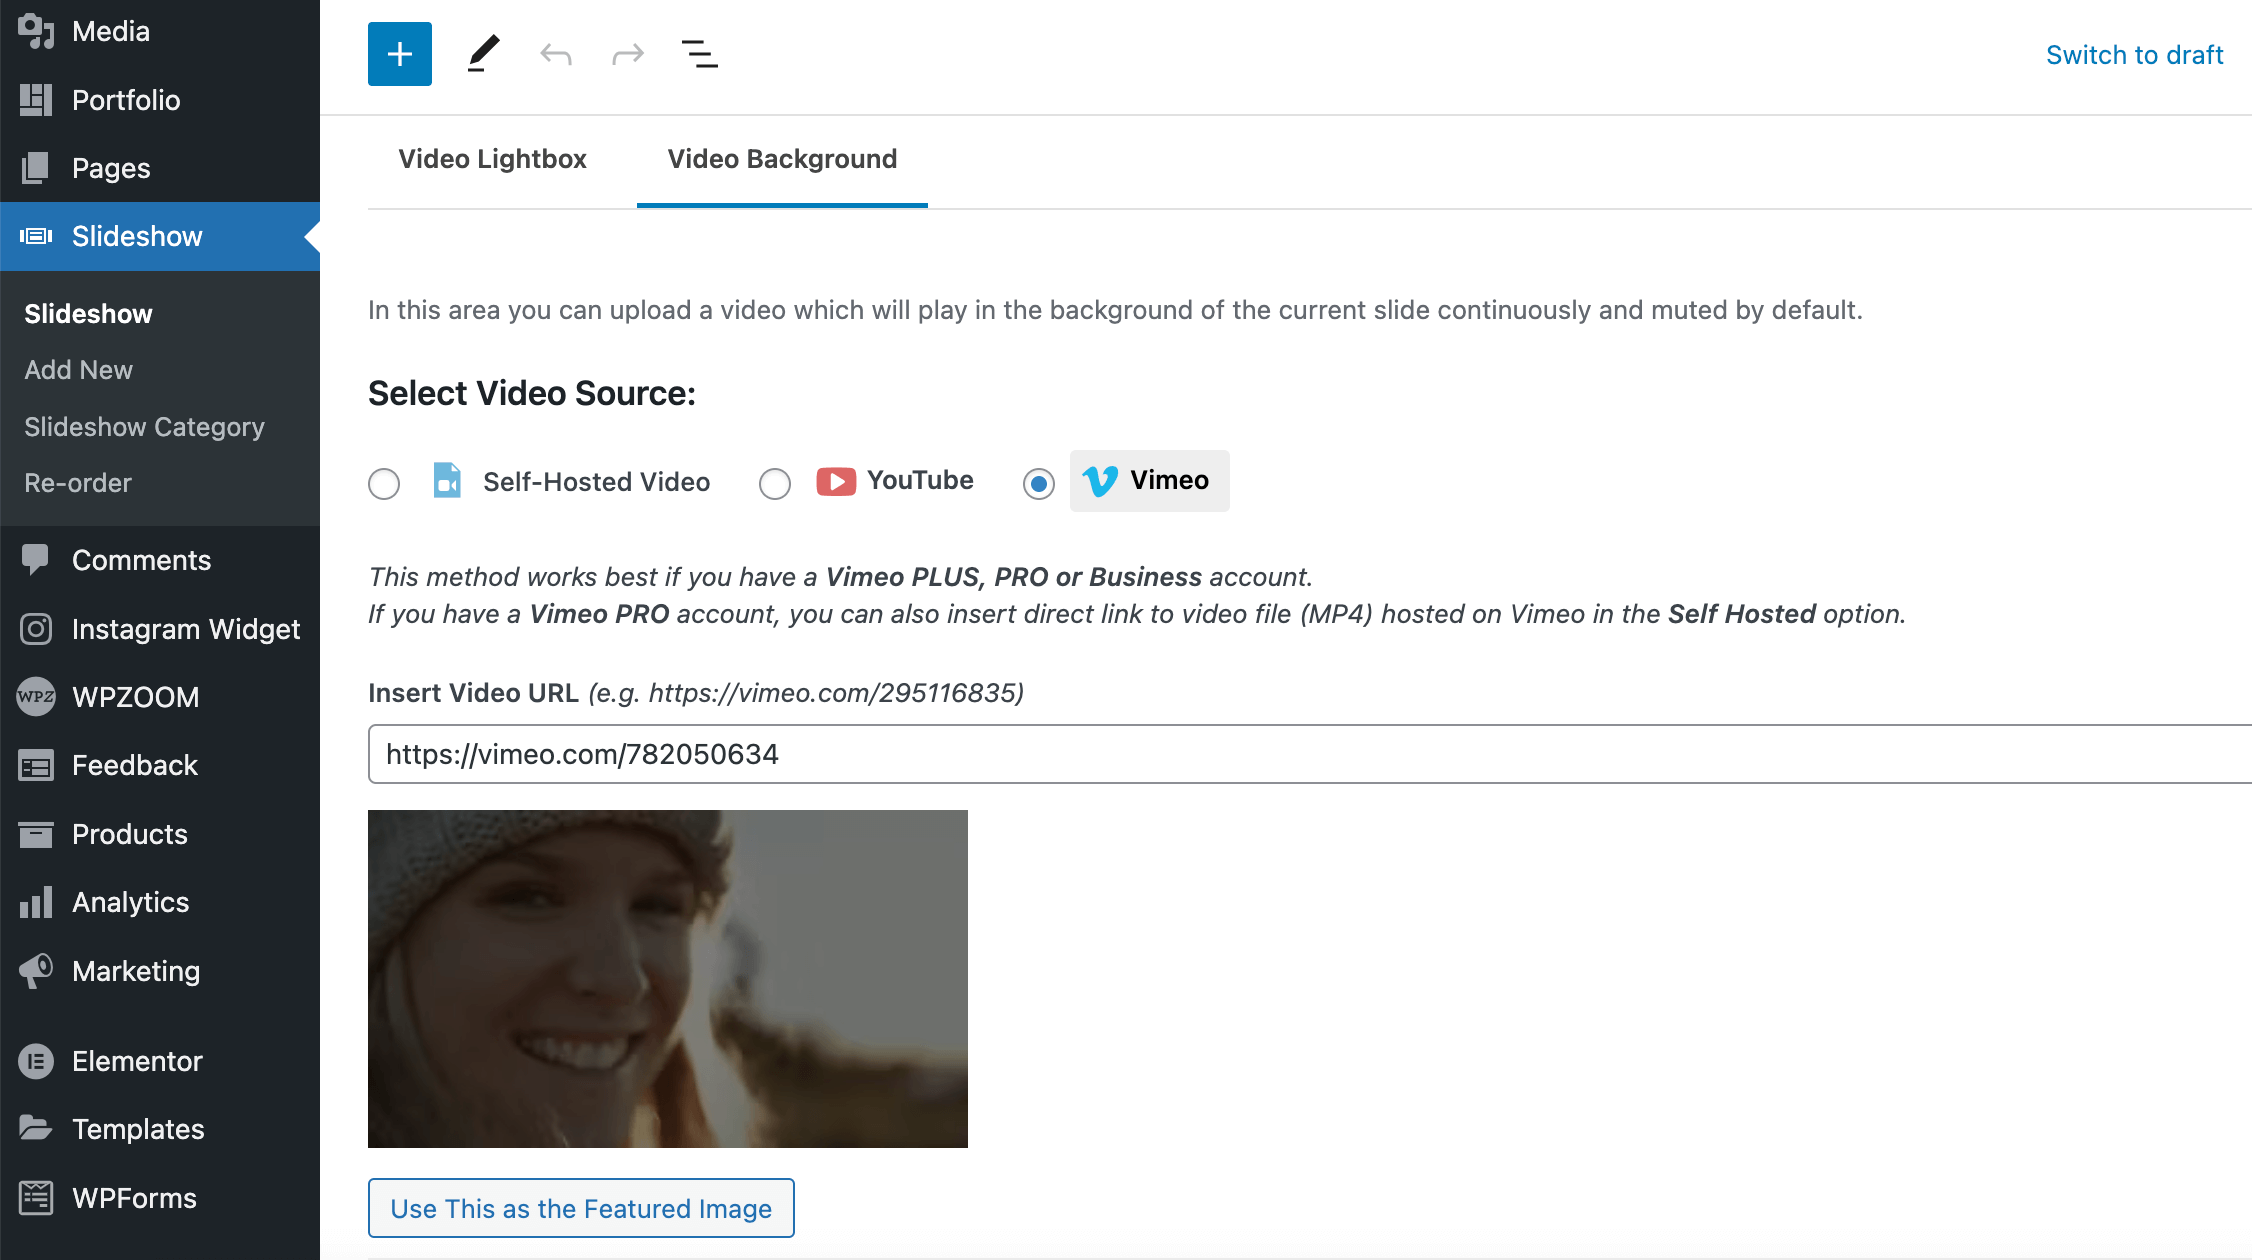
- Go to the Slideshow section in your WordPress Dashboard and click Add New.
- A post editor page will open, and you will add a title and a subheading (optional). Under the post editor area, you can find video background options.
- Select the Video Source option — either Self-hosted, Vimeo, or YouTube videos.
- Upload or add the link to the video in the corresponding field.
- After applying all the necessary settings, publish the slideshow post. It should now automatically appear on your website’s homepage.
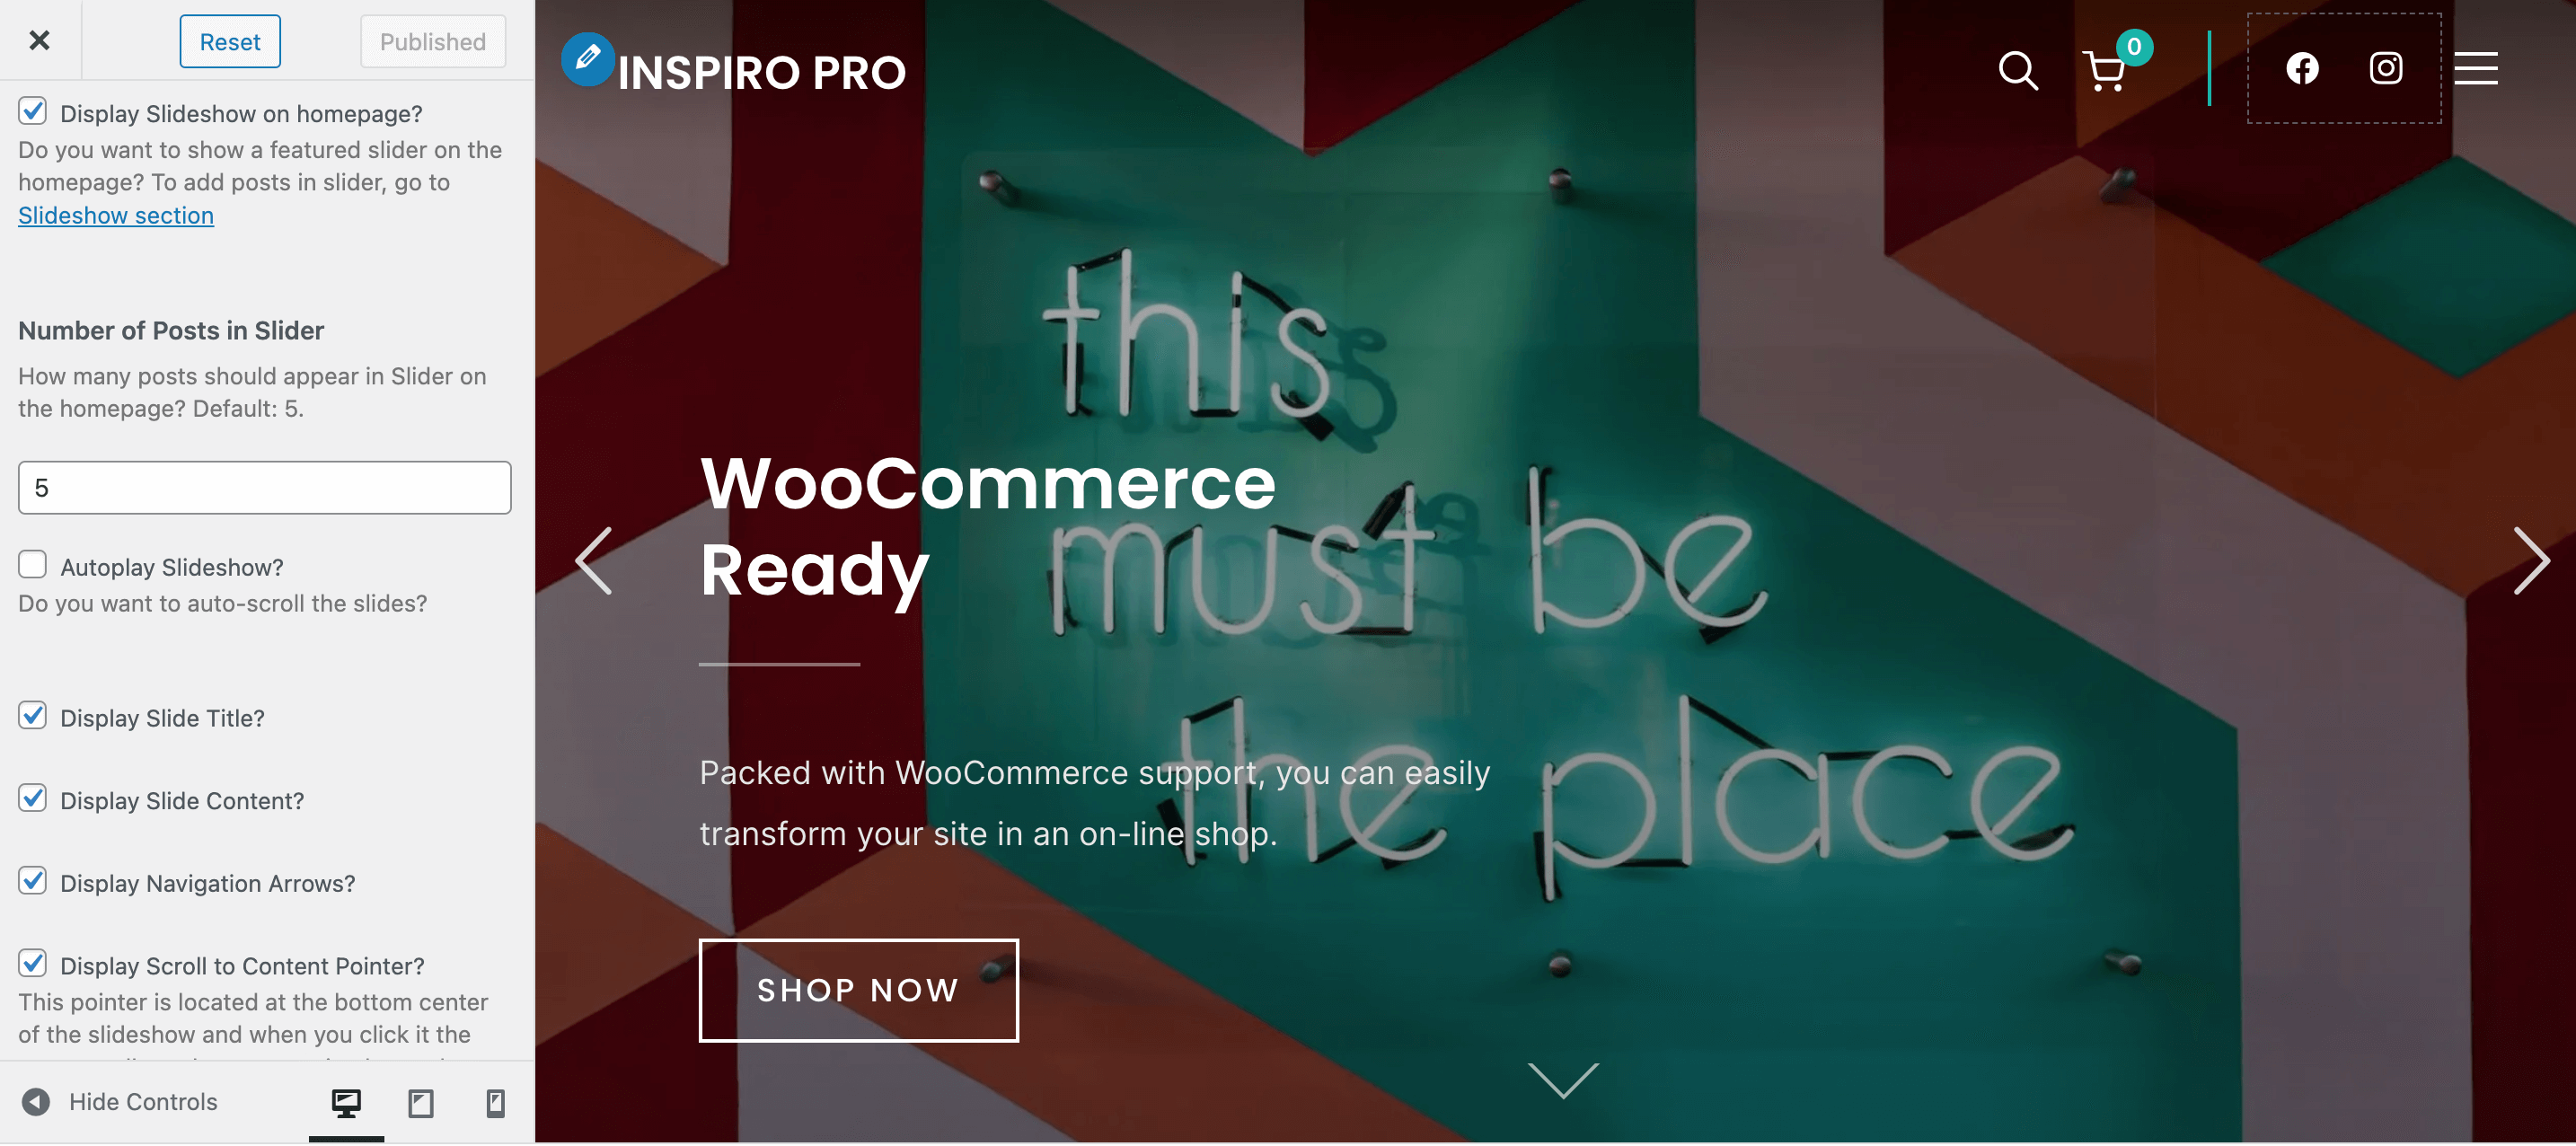
Inspiro PRO also includes options to customize the video background in Appearance > Customize > Homepage Slider.
Here are some other recommended themes that include premium features for video backgrounds in WordPress:

Reel is a video portfolio theme designed to help you quickly and easily create a professional video portfolio without any coding knowledge. It features a video lightbox, video background, and a live customizer among its unique offerings!

Inspiro Blocks PRO is a premium block theme that fully embraces the new Full Site Editor. It offers unique page templates, block patterns, and customizable color styles to help you create a stunning website.
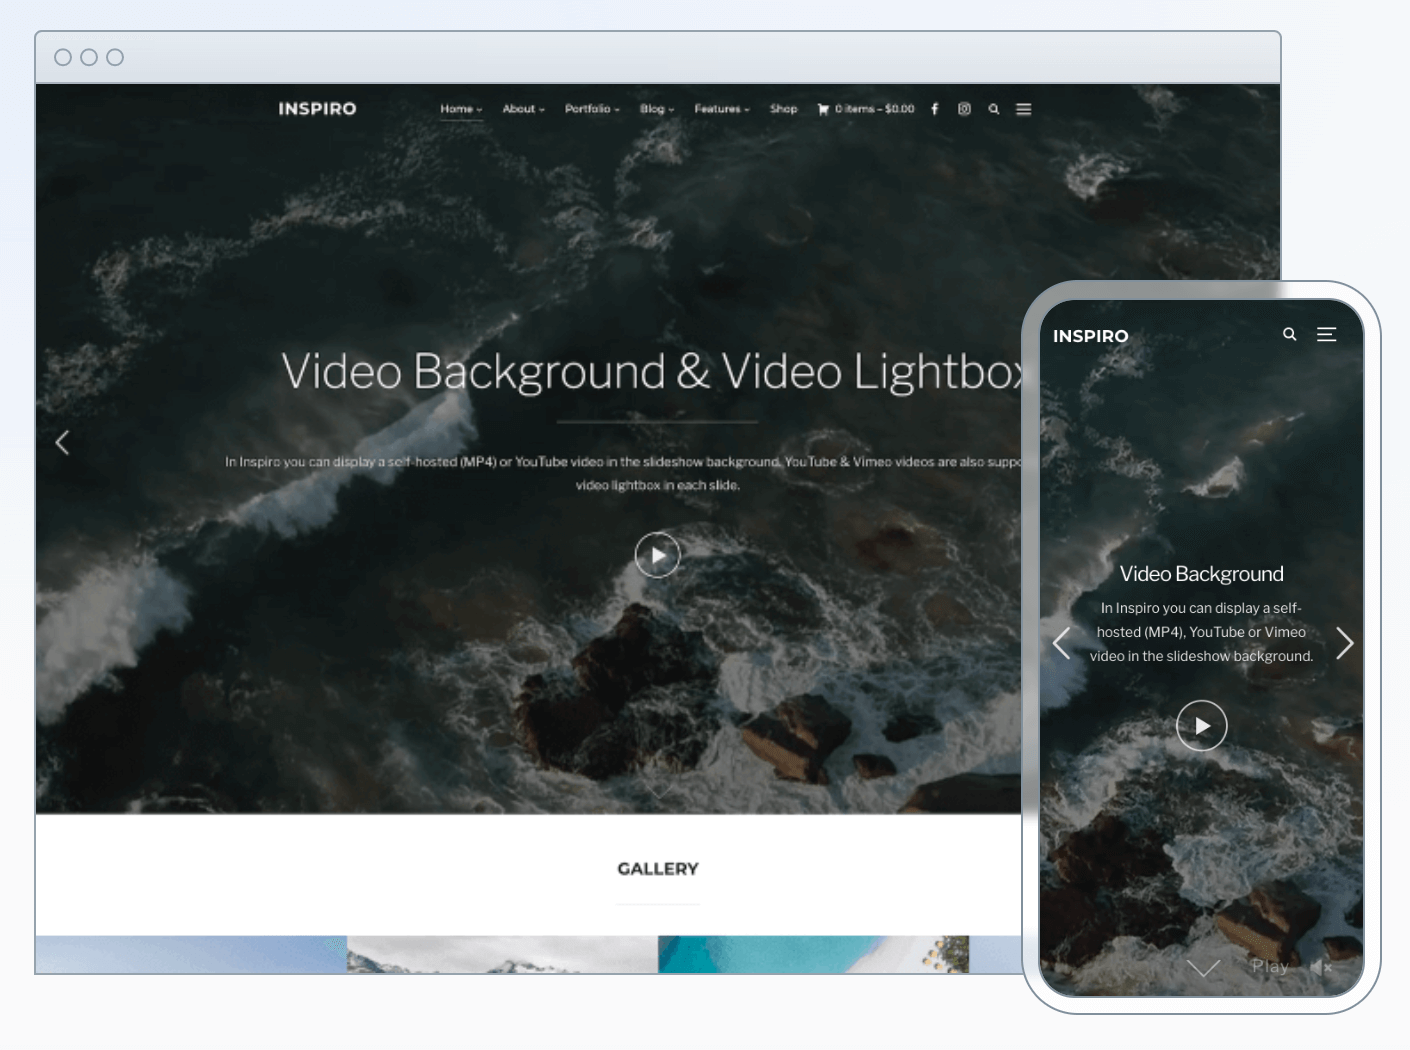
Inspiro Premium is a professional theme with a video background tailored to showcase photo and video content. It features a fullscreen slideshow perfect for a YouTube video background or self-hosted videos.
2. Use the Cover Block
Adding background videos with the Cover block is the easiest method since this is a default option of the WordPress block editor.
To achieve this:
1. Create a new page in Pages > Add New or edit an existing one.
2. In the page editor, click on the plus sign to add a new block.
3. Choose the Cover block and click on it to add it to your editor.
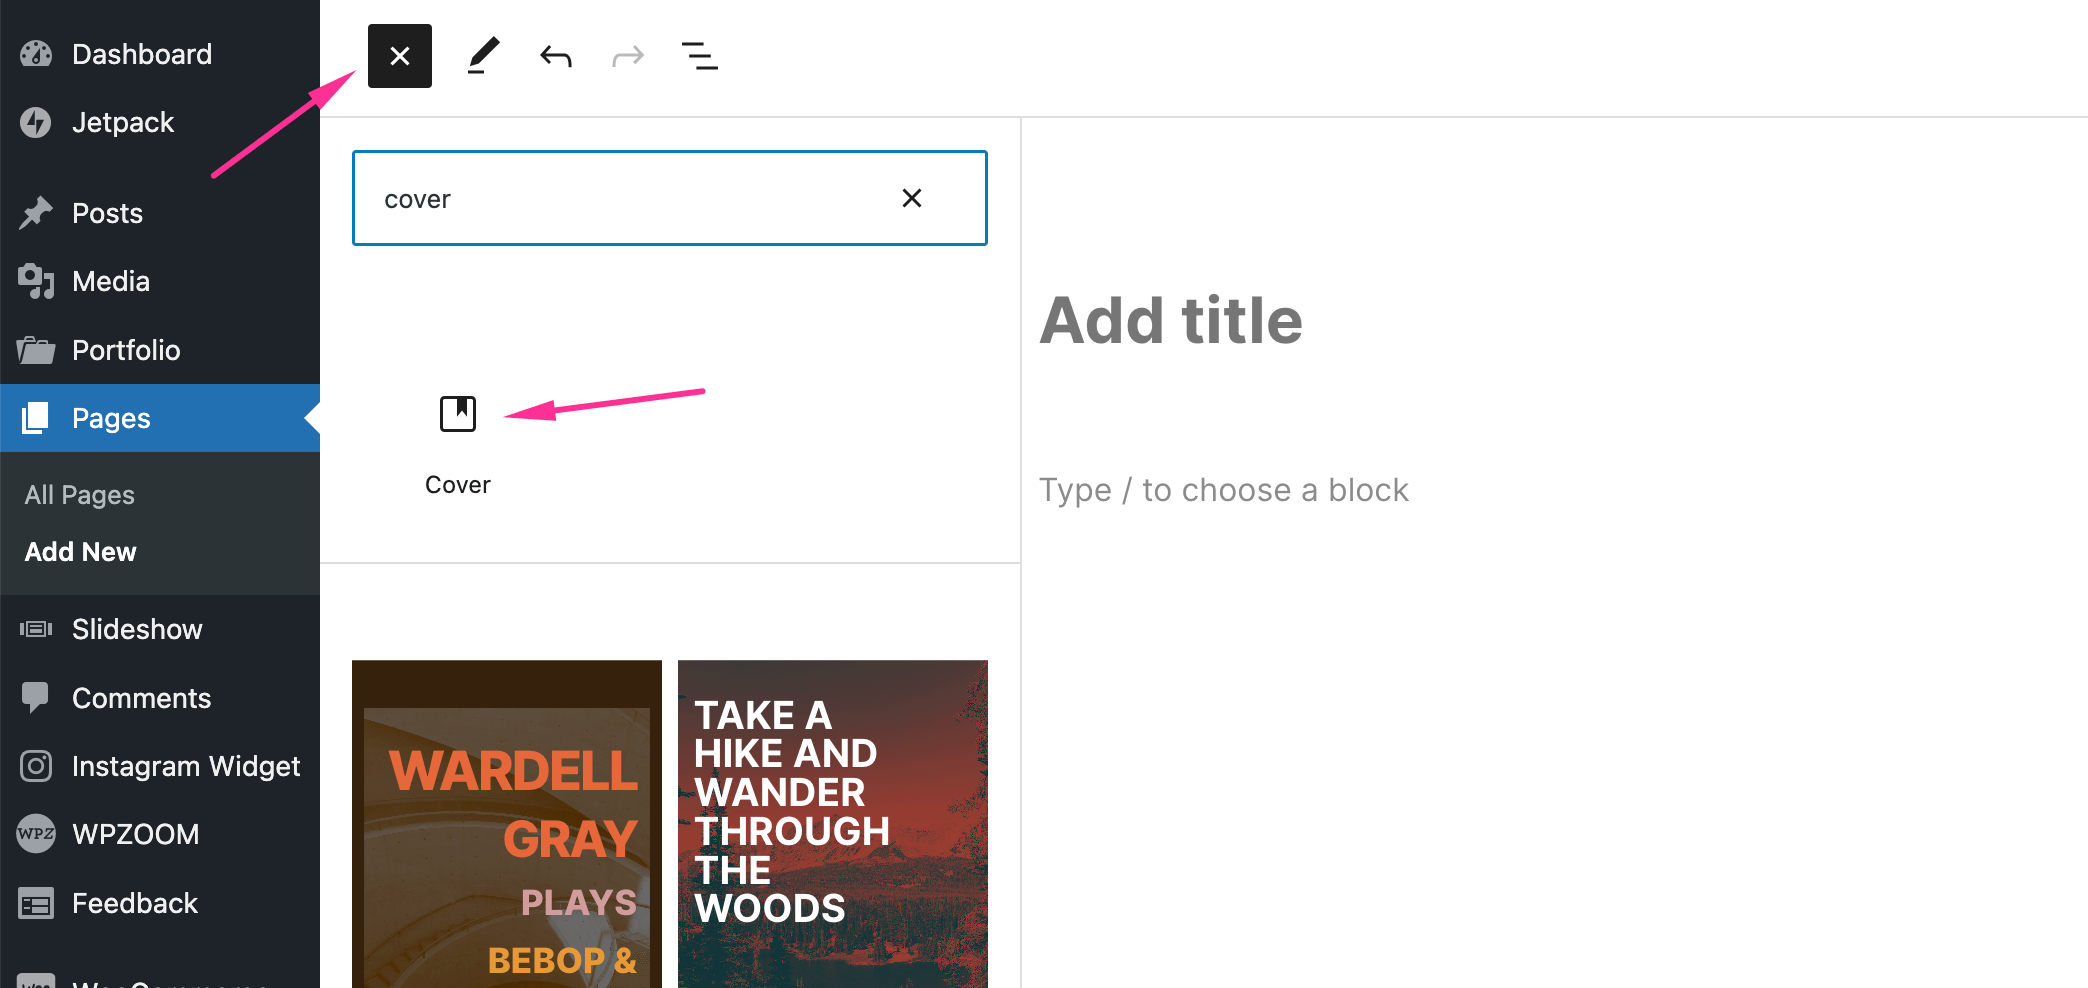
4. Once the cover block is added to your editor, click on Upload or Media Library to upload a new video or add one already in your media library.
5. Choose the desired video file in the popup window and click Select.
6. At this point, you can preview your background video in the editor. You will also see that the video contains an overlay color and the option to add a title. Both these settings are optional and can be adjusted. For example, you can turn off the overlay in the Styles tab in the right post editor sidebar by turning its opacity to 0.
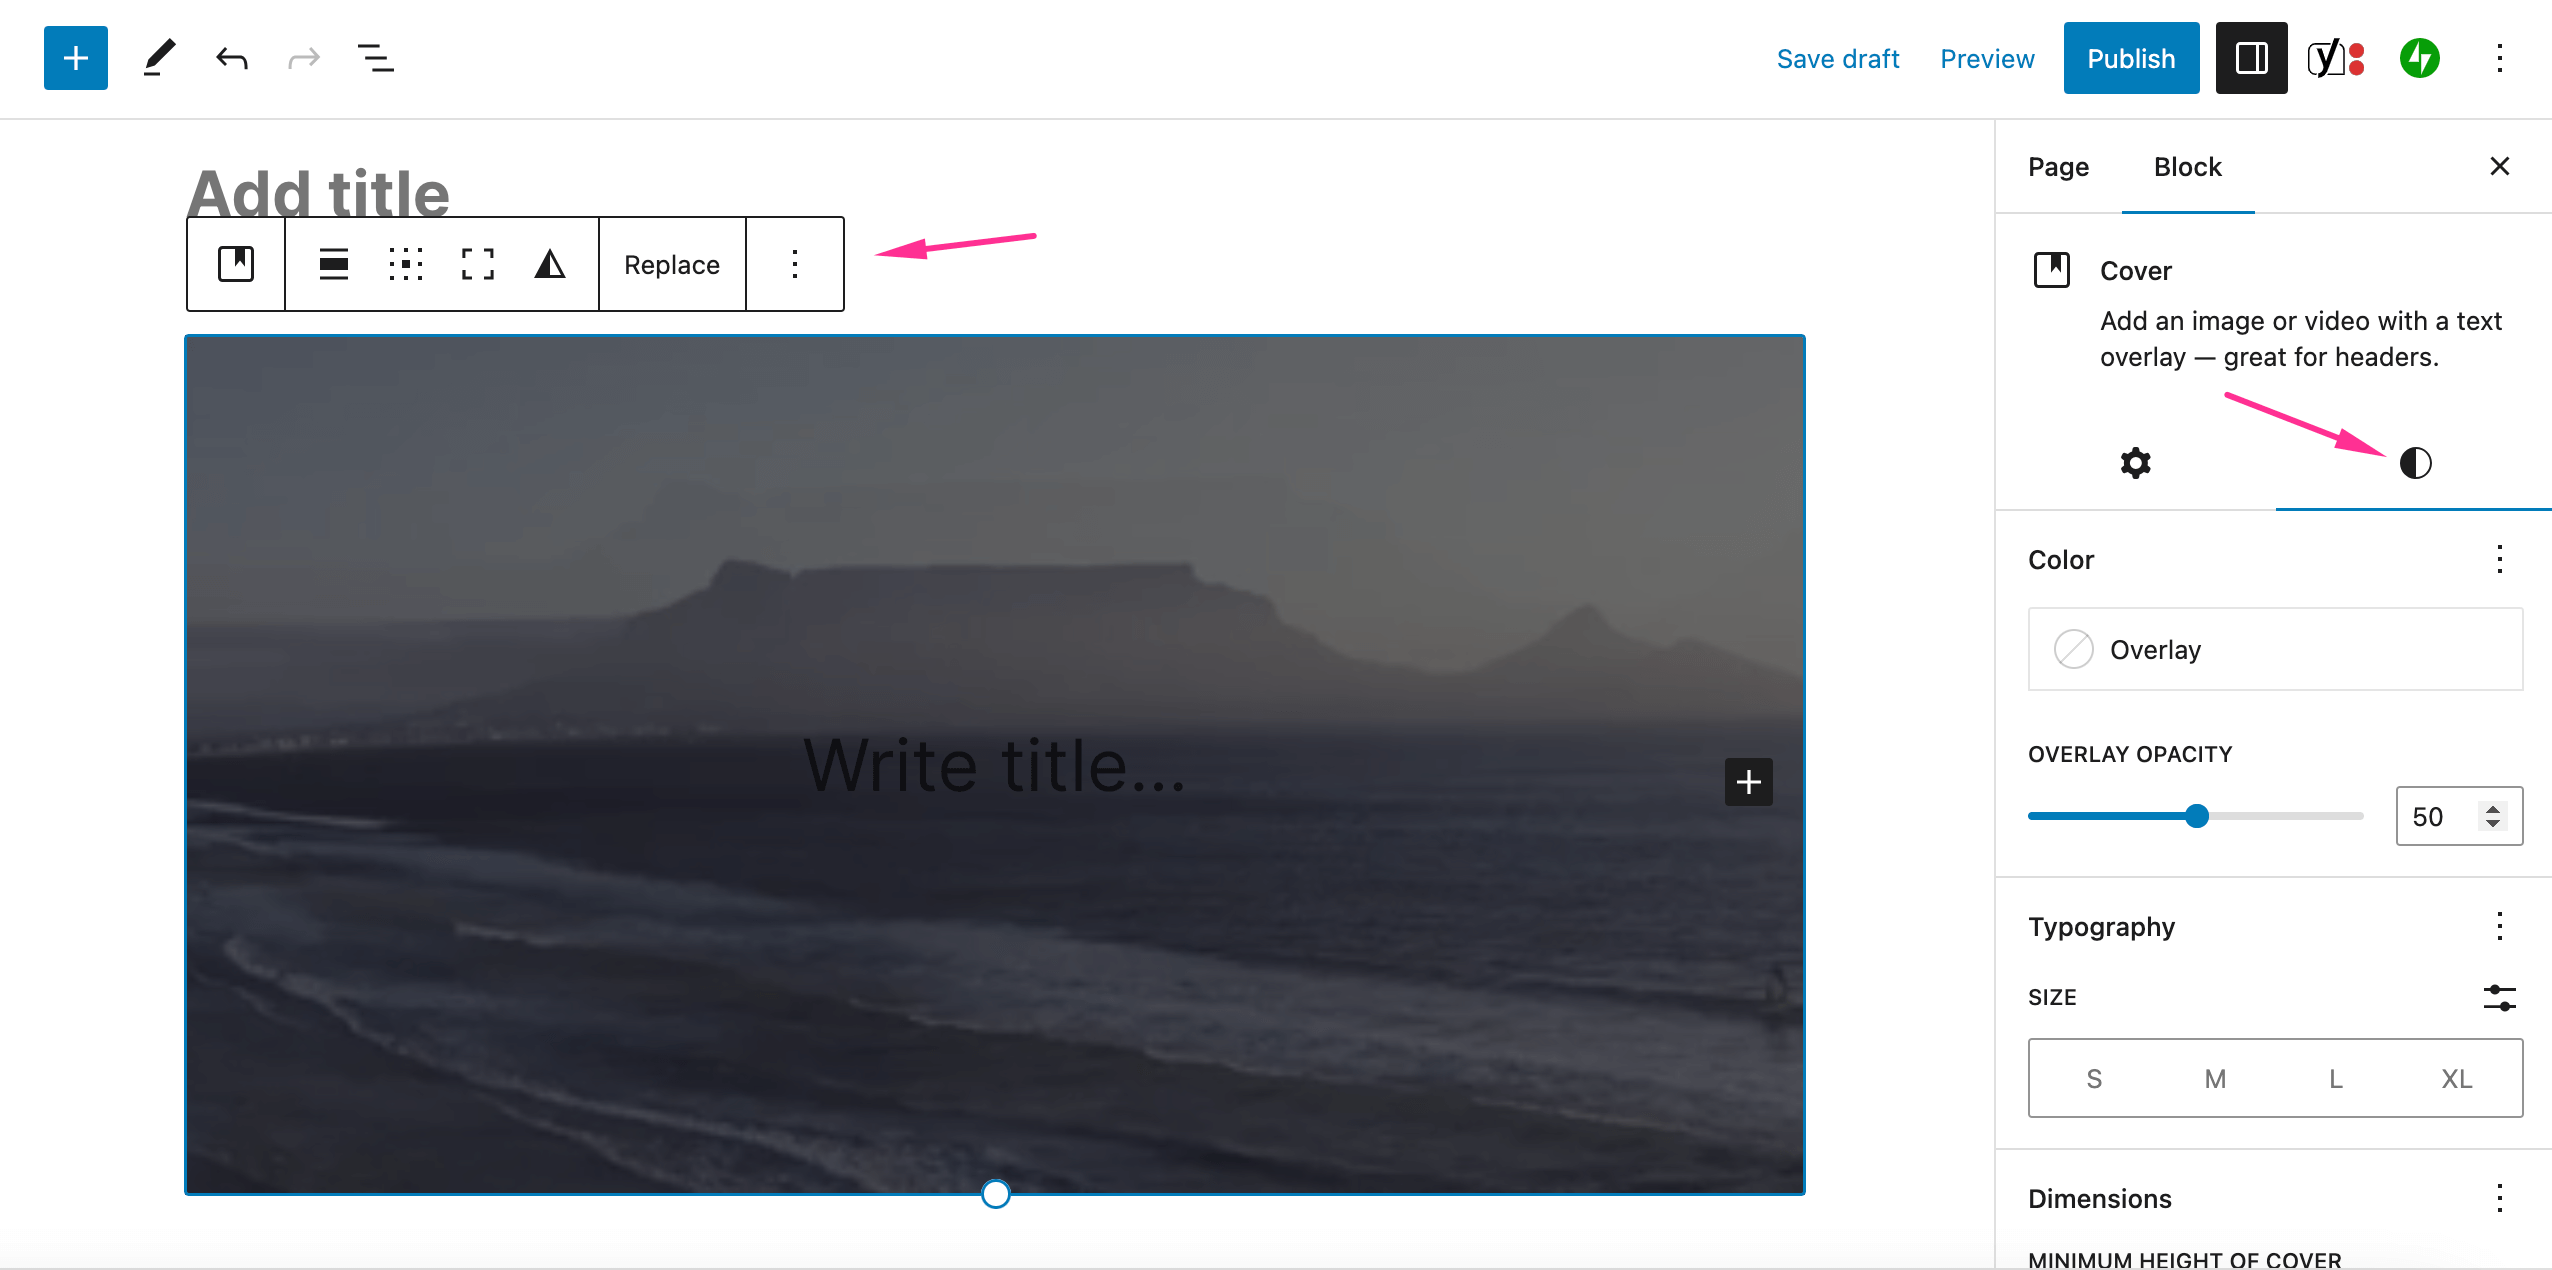
Once the cover block is selected, you will see all its available options in the block toolbar and in the right sidebar of the editor in the Settings and Styles tab.
Once you’ve made the necessary adjustments, publish the page where you can view the background video on your website.
3. Use Video Background Plugins
Using a specialized plugin is another popular and easy way of adding a video background in WordPress.
1. The first step is to install the Advanced WordPress Backgrounds plugin and activate it on your website.
2. Then, create a new page or edit an existing page and add the Background (AWB) block to the editor.
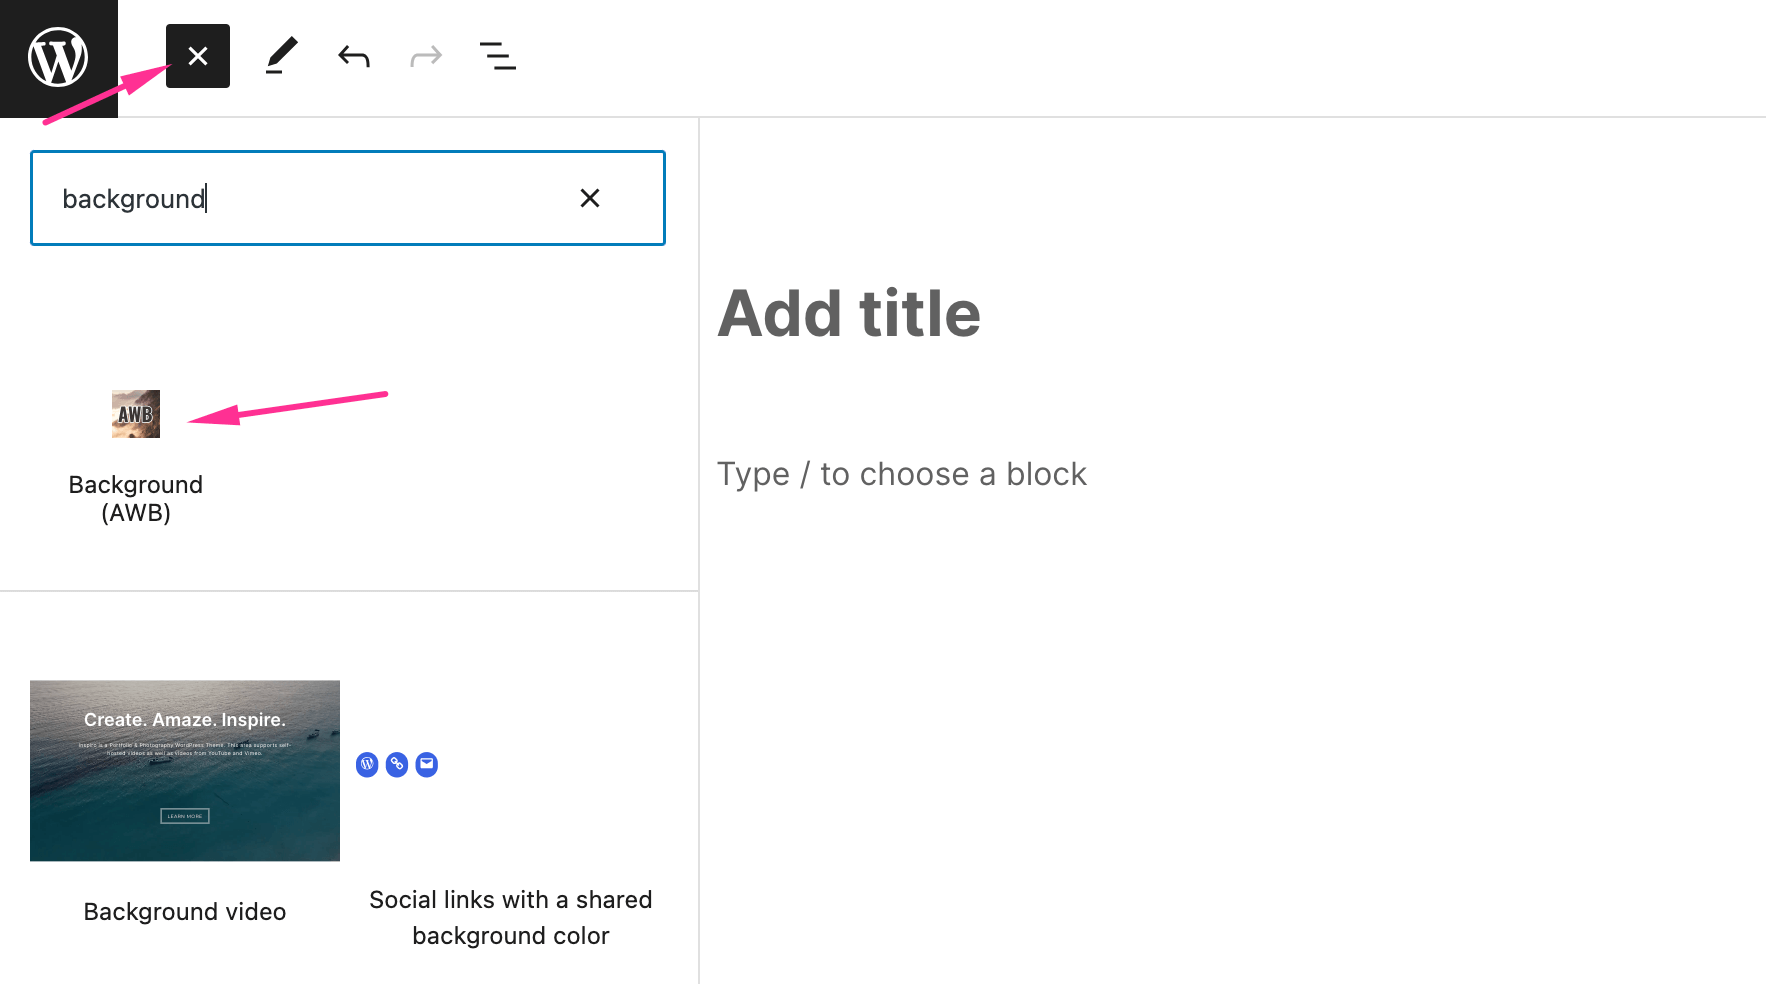
3. An apparent empty block with a + sign in the middle will be added to your editor. Clicking on the + sign within the block will prompt you to add blocks that will be displayed over the video background (e.g., heading, paragraph, button).
4. Select the block with your cursor and see all its available options in the right sidebar.
5. To add a WordPress video background, click on Video in the Settings tab and select the YouTube/Vimeo or Self-hosted option. Depending on your choice, add the video link or choose one from your Media Library.
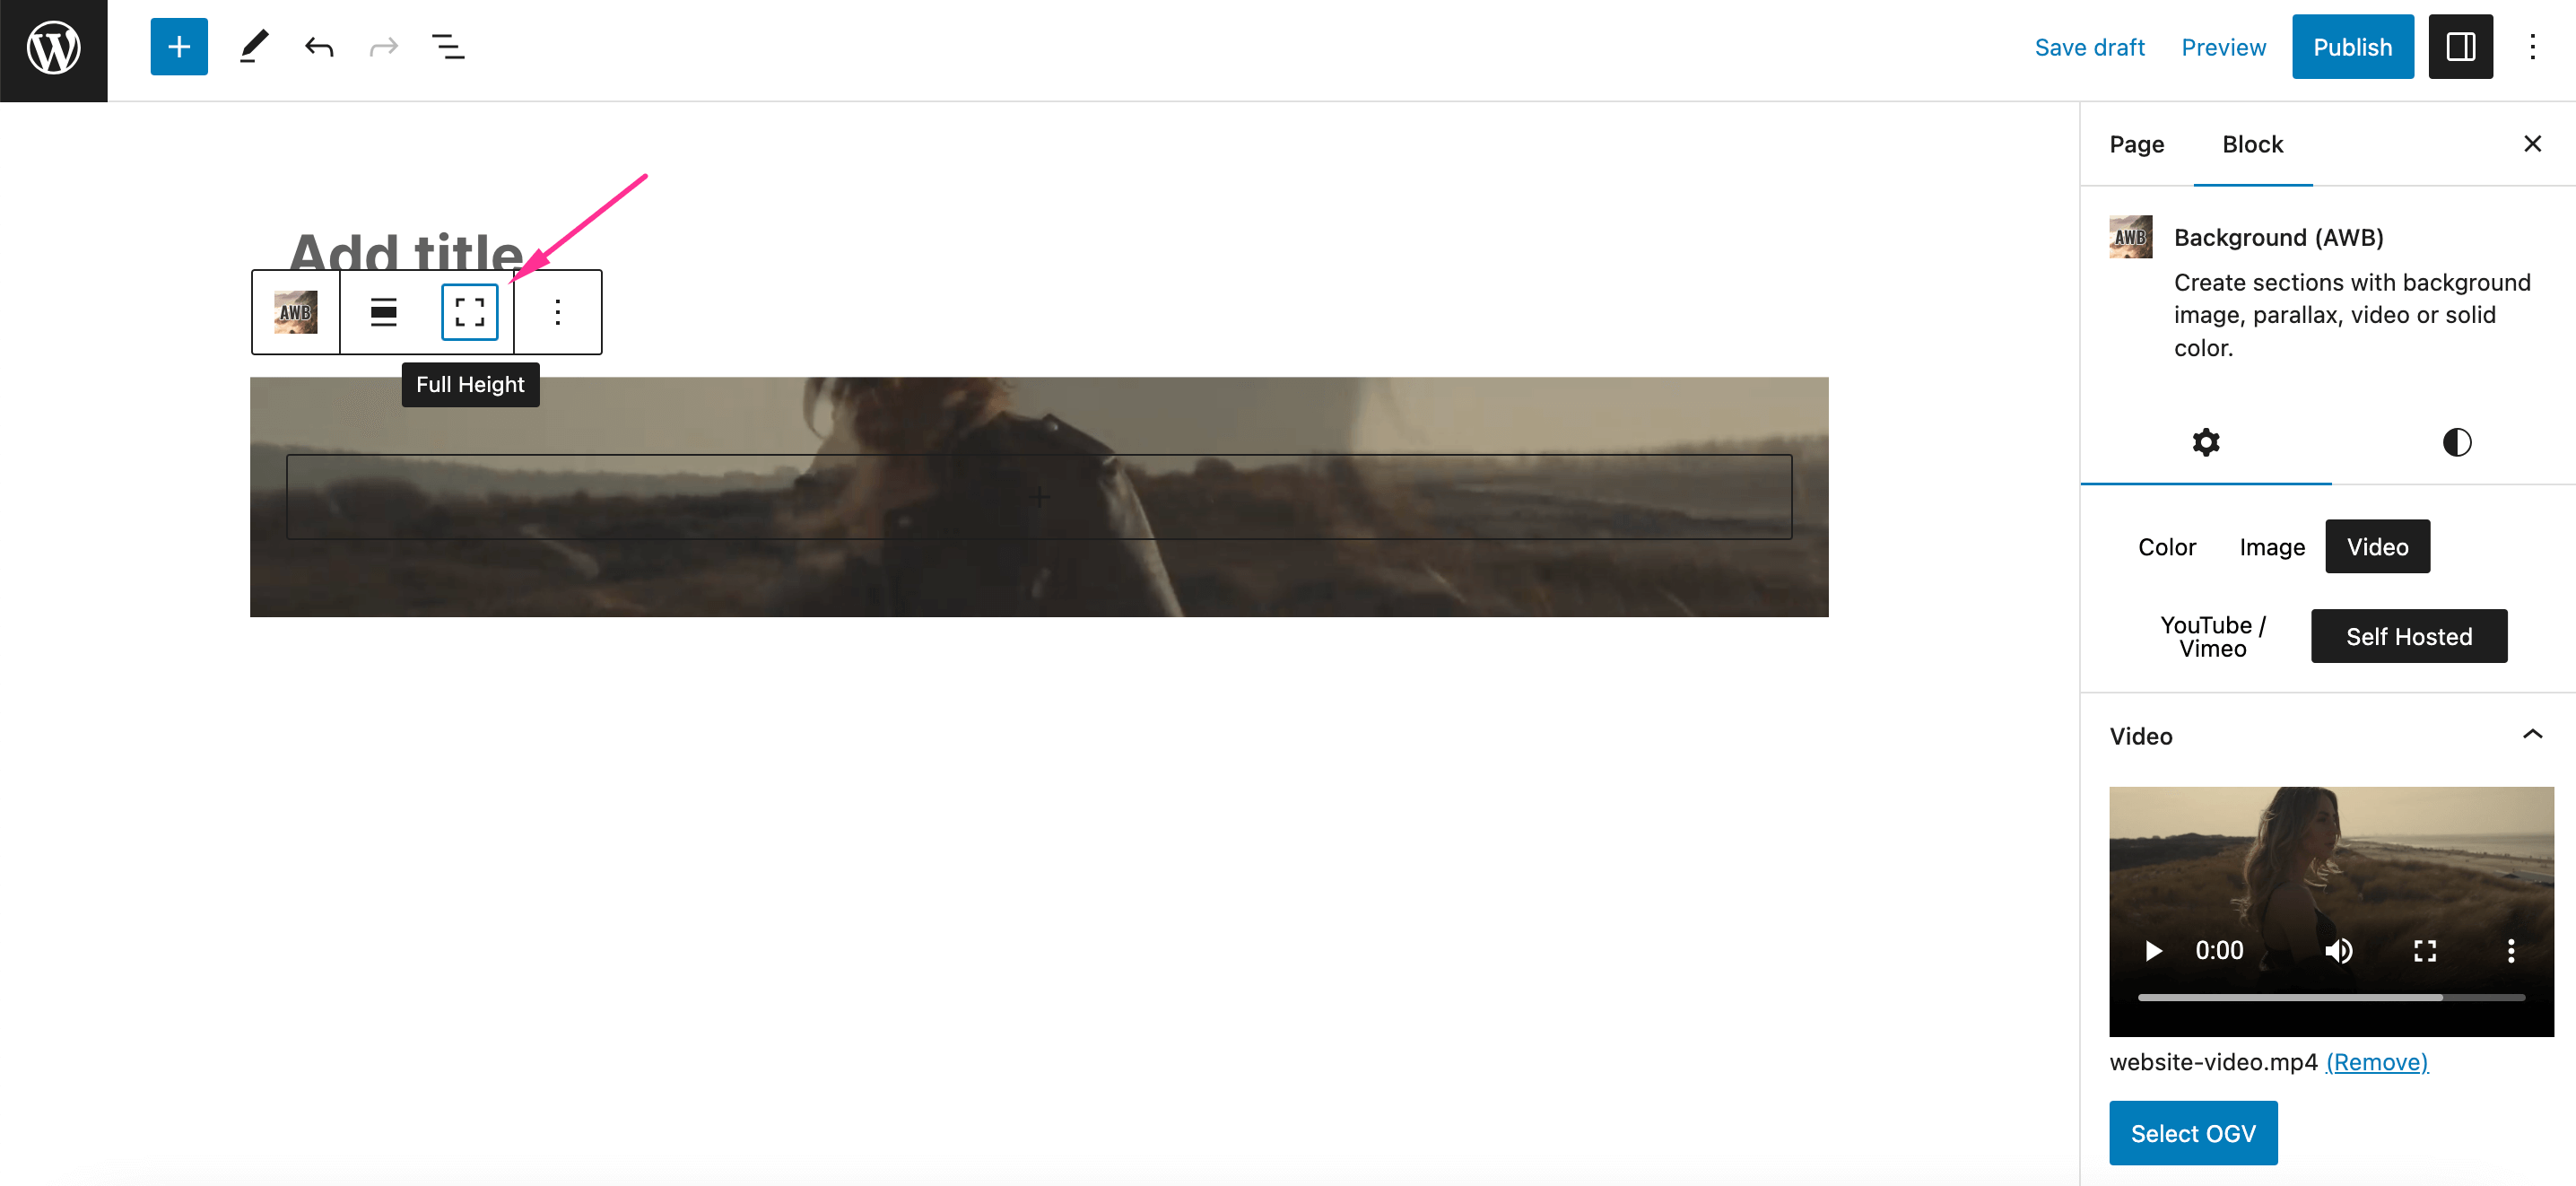
Once you add the video, it will be displayed in your post editor in a small row. To adjust the height of the video, click on the Full Height icon in the block toolbar.
Additional customization settings for the video background are available in the Settings and Style tabs from the right sidebar of the post editor.
Publish the page to view the newly created video background on your website.
4. Add a Background Video with a Page Builder
If you find it easier to create your website with a page builder, it’s also possible to add a video background with most page builders. Since Elementor is one of WordPress’s most popular page builders, we’ll use it as an example.
1. Install and activate the Elementor page builder on your website.
2. Then, create a new page or edit an existing one previously created with Elementor.
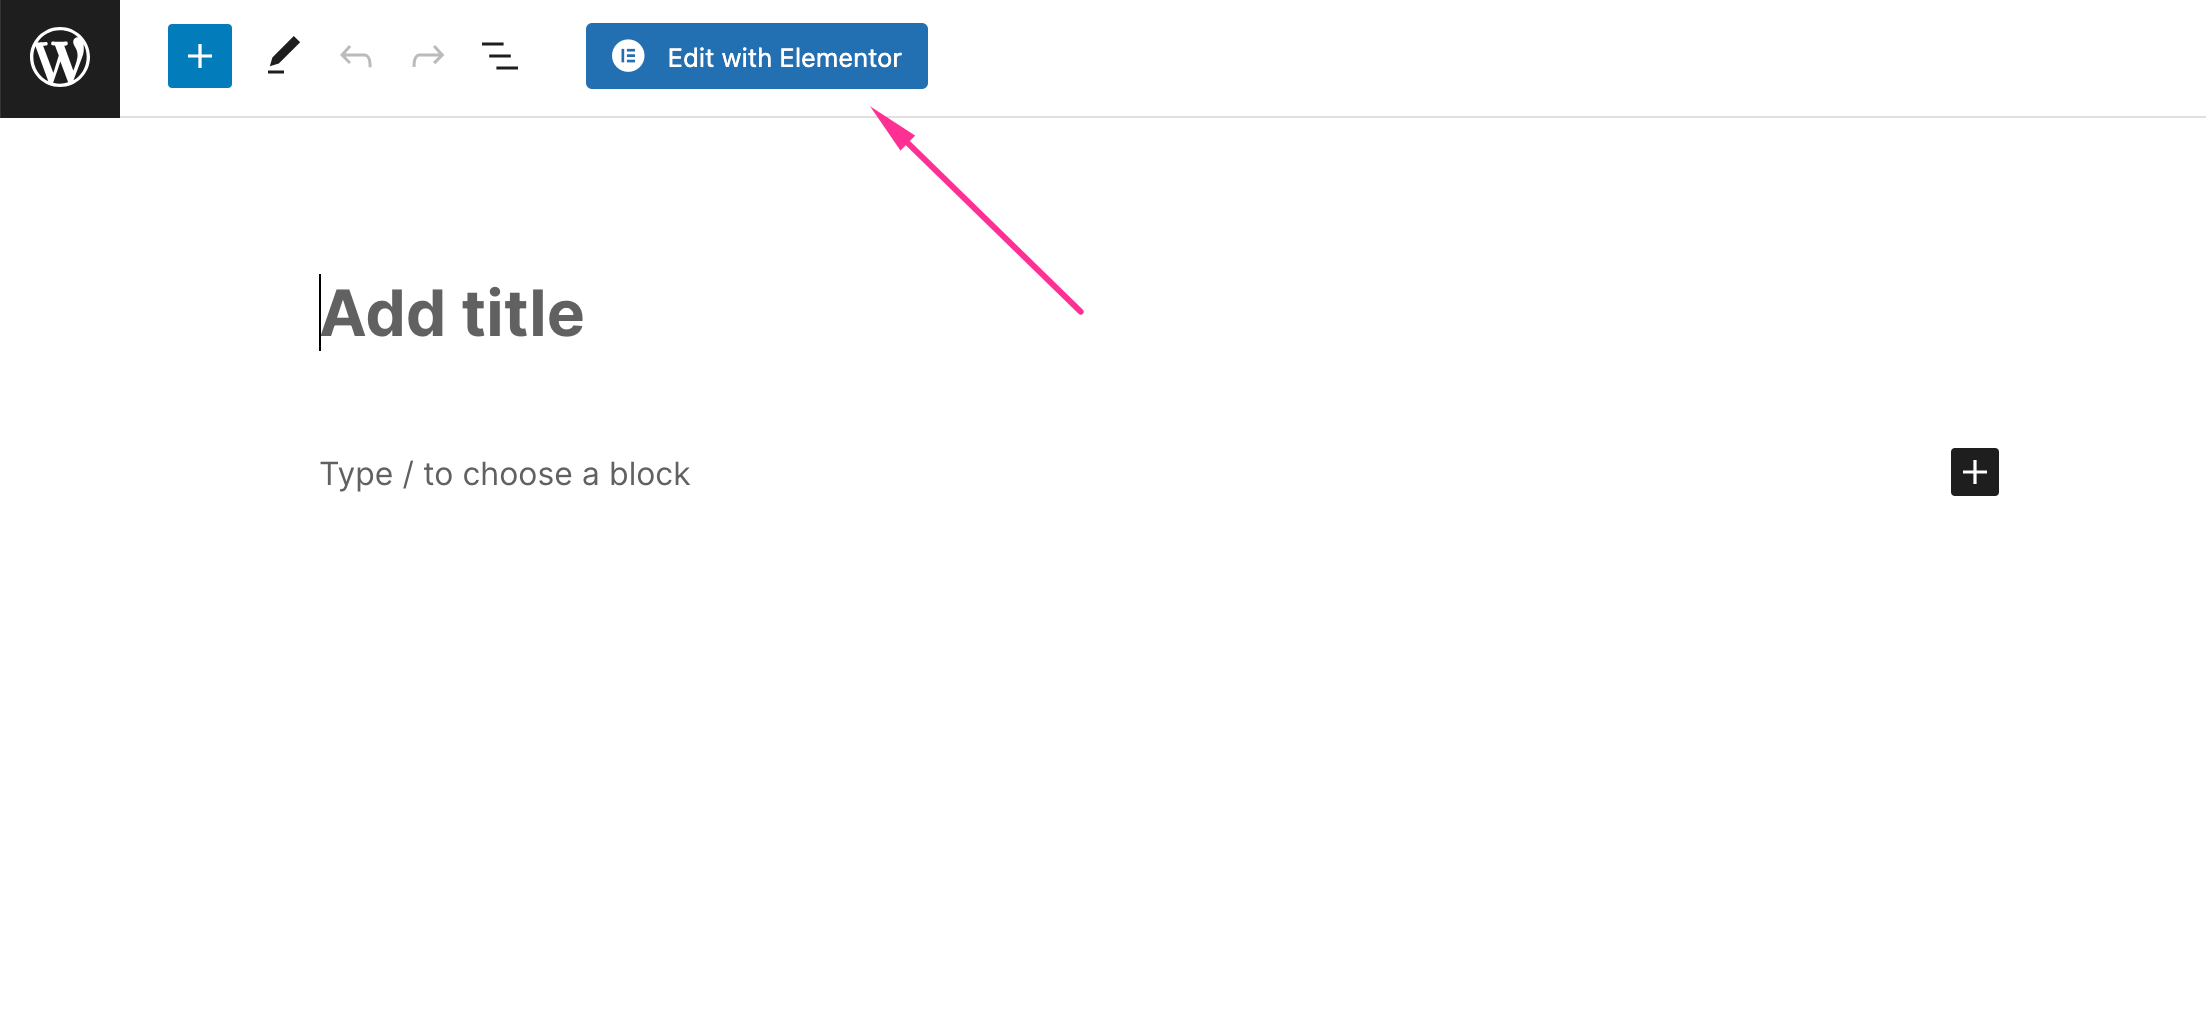
3. Click on the Edit with Elementor button.
4. In the Elementor interface, click the + icon to add a new section.
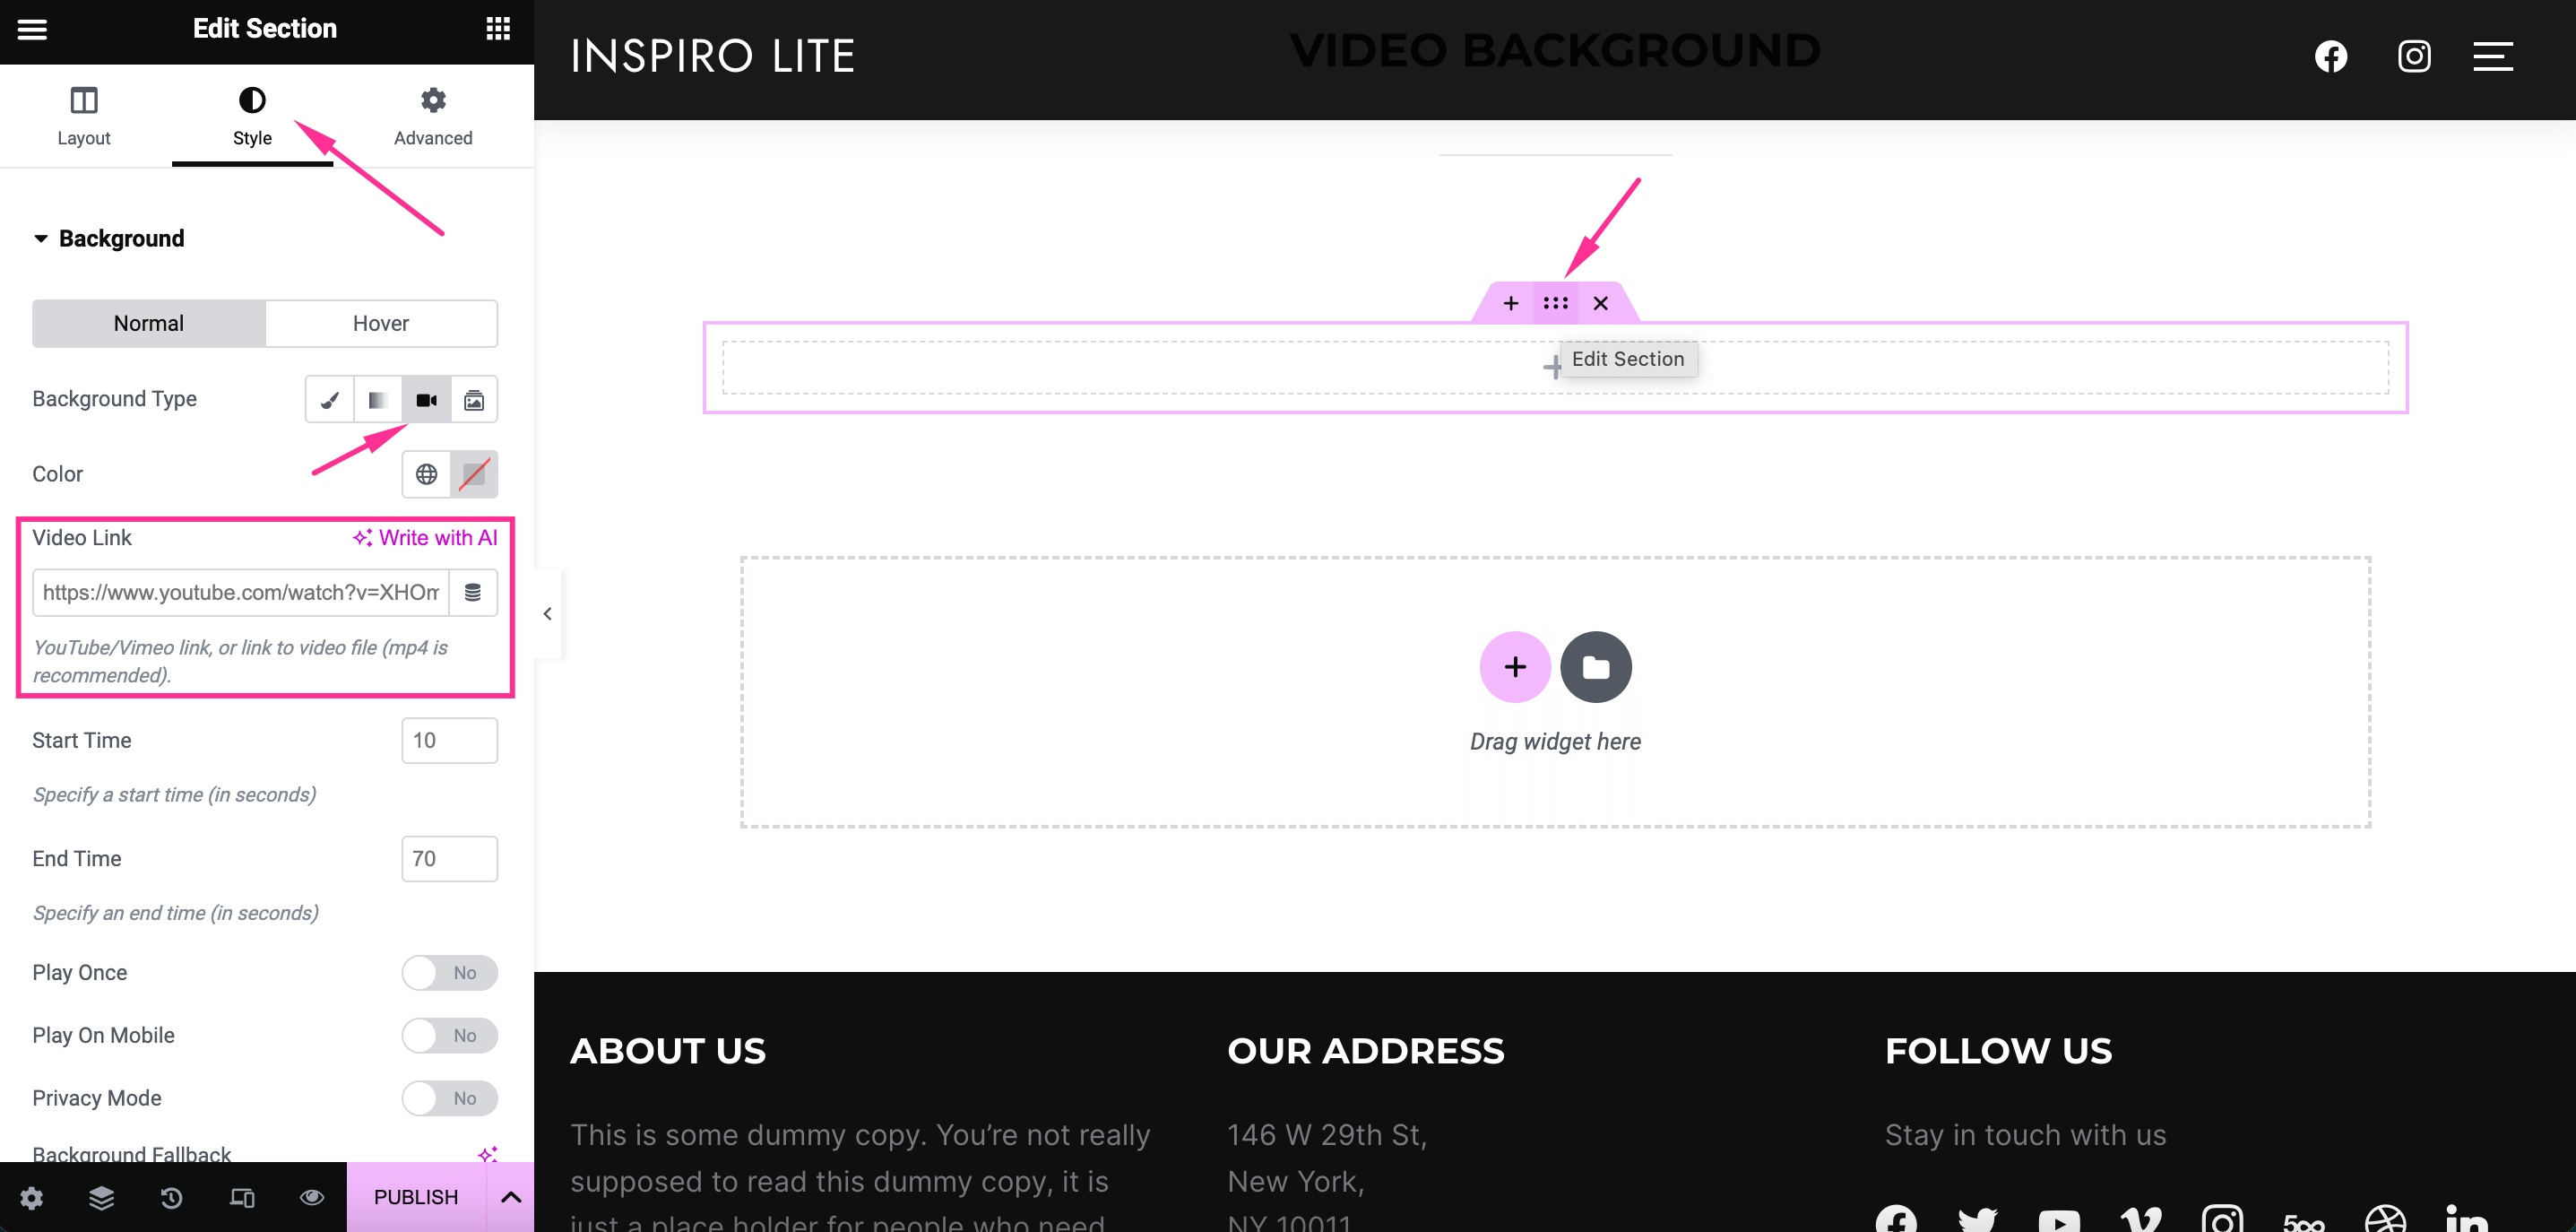
5. Select the one-column structure if you need to create a full-width video background. Then, click on the six dots icon at the top of the section and access the Style tab in the left sidebar.
6. Click the Background option and the video icon in the Background Type field.
7. Add the link to your video in the Video Link field.
To adjust the height of the video, click on the Layout tab and choose the height option that suits you in the Height dropdown. To create a custom height, select the Min Height option and add a height value in the below field.
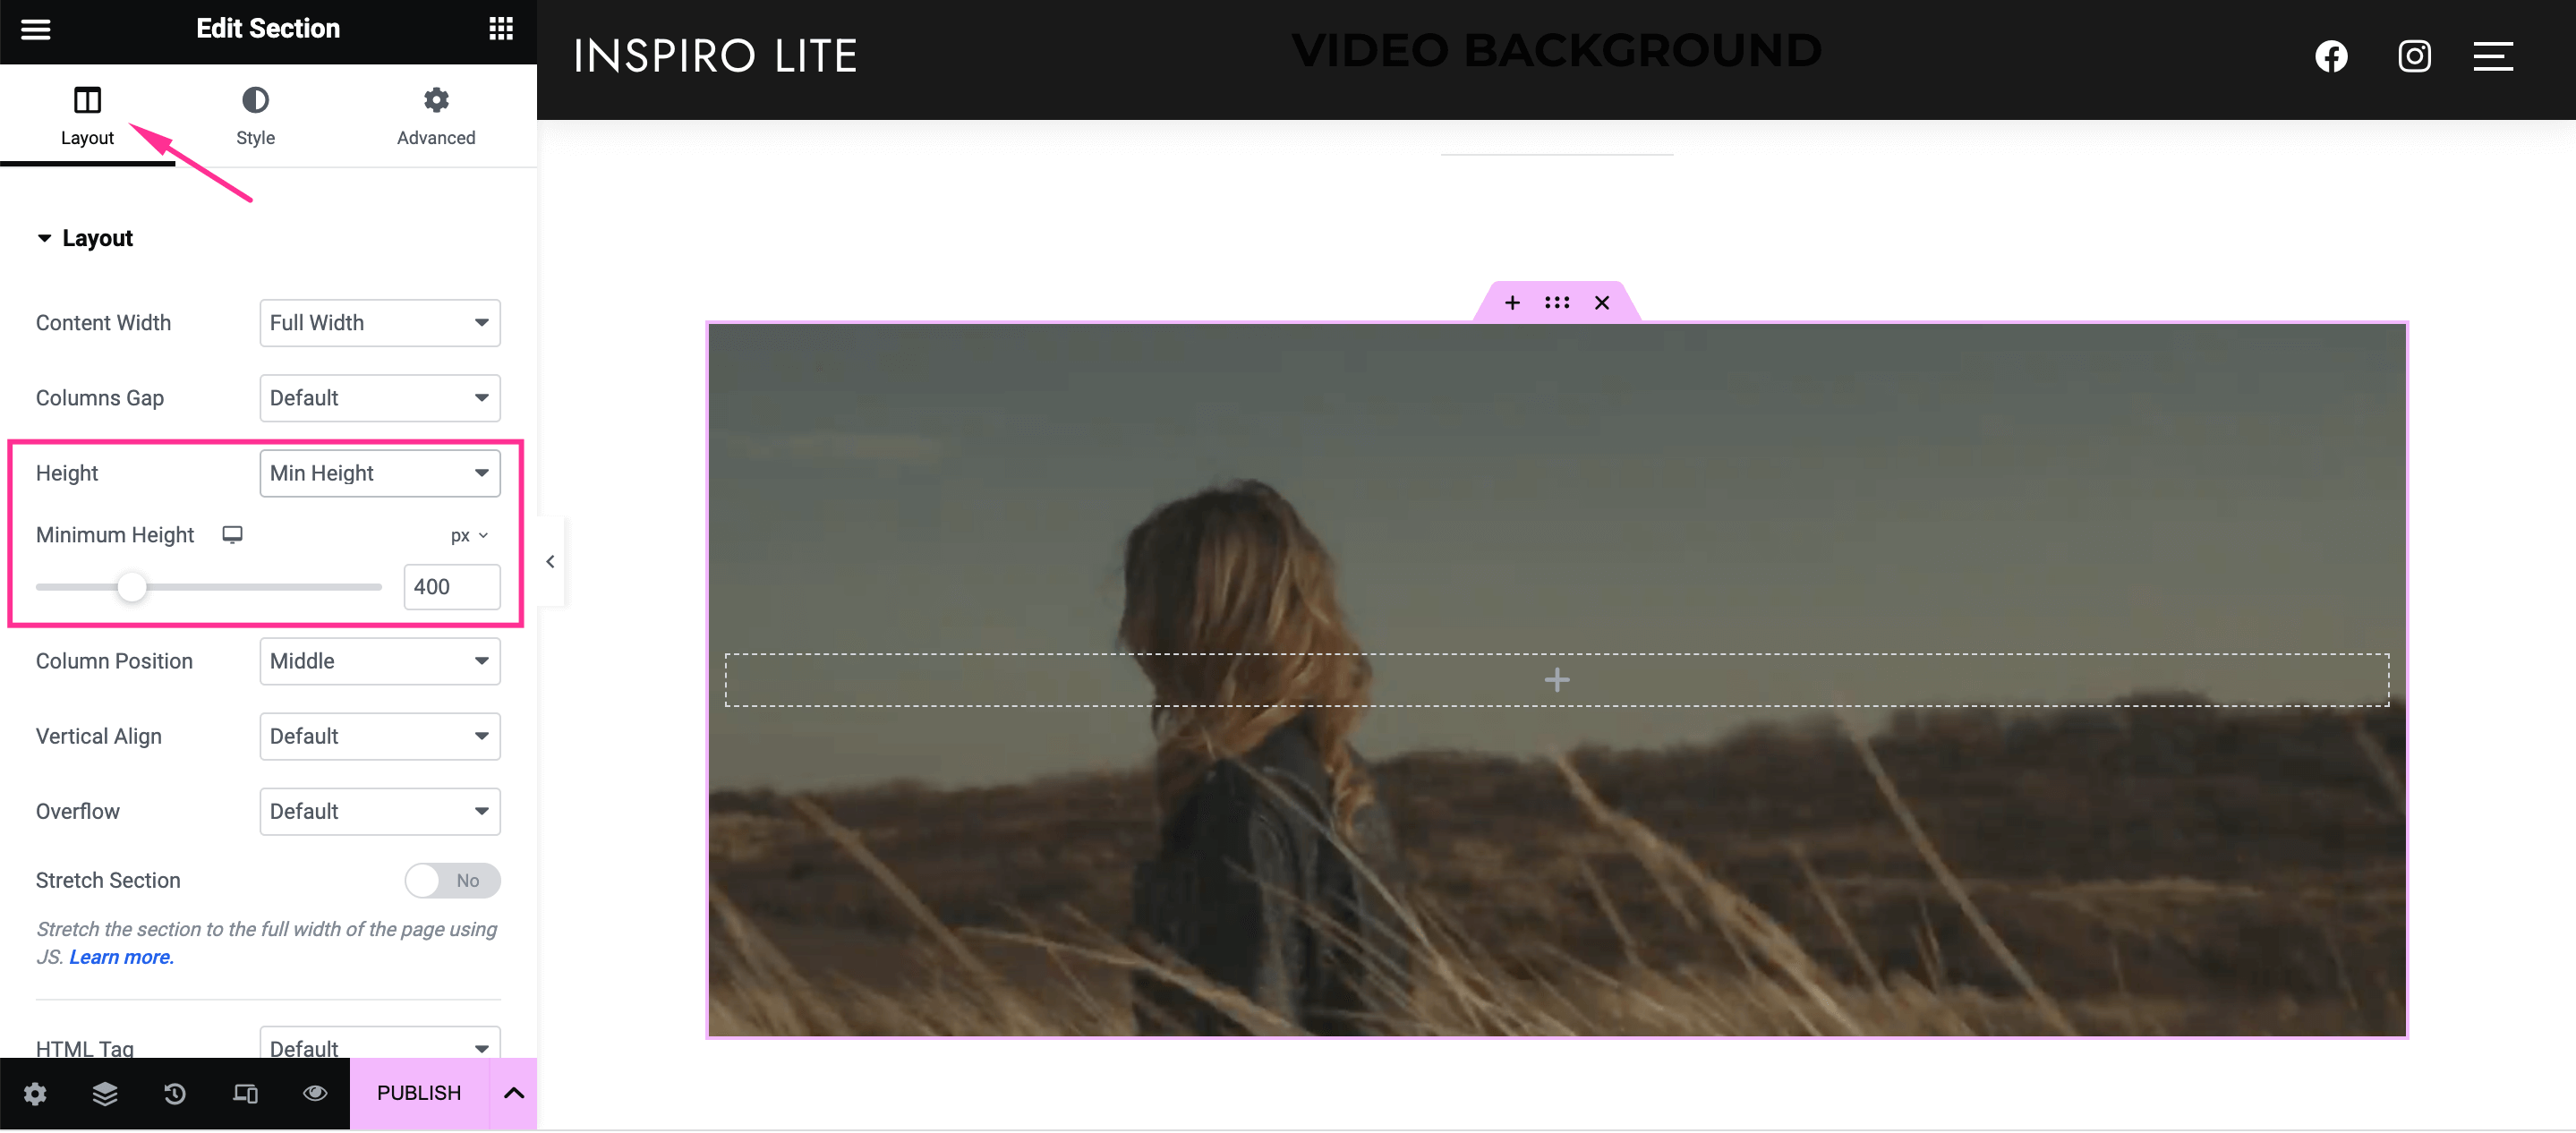
Additional customization settings for the video background in Elementor are available in the Layout, Style, and Advanced tabs from the left sidebar.
After applying the desired settings, publish the page to make the video background available on your website.
Best Practices for Adding a WordPress Video Background
If this is your first time working with WordPress video backgrounds, it might be helpful to implement the following best practices:
- Use a short video loop: A short video loop helps create a more seamless look and ensures your site’s speed and loading times aren’t compromised.
- Choose the right video: Use a fullscreen background video that matches your field or brand and resonates well with your audience.
- Host videos externally: Hosting videos on dedicated platforms like YouTube or Vimeo improves video playback performance and reduces strain on your website’s server.
- Optimize self-hosted videos: When adding them as backgrounds, optimize them to improve your website’s user experience and SEO.
- Use the proper video format: The most common format for self-hosted videos is MP4 with 720p resolution and the h264 codec.
- Keep it simple: Use elements like title, description, and CTA, but only add them if necessary to avoid overloading your video background.
- Mute videos by default: Muted videos ensure visitors have a pleasant user experience; also, most browsers don’t autoplay video backgrounds on mobile devices if audio is enabled.
Elements to Include in a Homepage Video Background
Let’s talk about some of the most important elements that need to be added to a WordPress video background:
- Branding elements. Add your logo, colors, fonts, and slogan over the video background to match your brand and create a professional and trustworthy look for your website.
- Eye-catching visuals and colors. Choose the right video with eye-catching visuals and colors so it visually pleases your site visitors and grabs their attention.
- A clear Call-to-Action (CTA). Include a button with an engaging CTA like “Read More” or “View Services” to persuade your visitors to interact with your website.
- Engaging copy. Compliment the video background with engaging copy. For example, you can write a short headline or fun introduction section using the secondary text area.
- Use a screen size-optimized video background that fits right across all devices, especially on mobile devices.
Advantages of Using Video Backgrounds in WordPress
With users spending 88% more time on your site if it has video elements, it is even more crucial to showcase a video background on your homepage. In addition to this, it can also improve the overall user experience on your WordPress site and enhance brand loyalty.
Let’s talk about some of the major benefits of using WordPress video backgrounds :
- Create a more engaging and interactive user experience for visitors. Video content is generally more engaging than plain old text with images.
- Grab attention more easily. This helps create a more professional first impression for new site visitors and convinces them to browse your site further.
- Reduce the bounce rate – the percentage of site visitors who leave or “bounce” off after viewing only one page.
Successful Video Background Examples
While the background you go with will be unique, looking for inspiration from some existing examples is useful. Here are two notorious WPZOOM customers and their homepage video backgrounds:
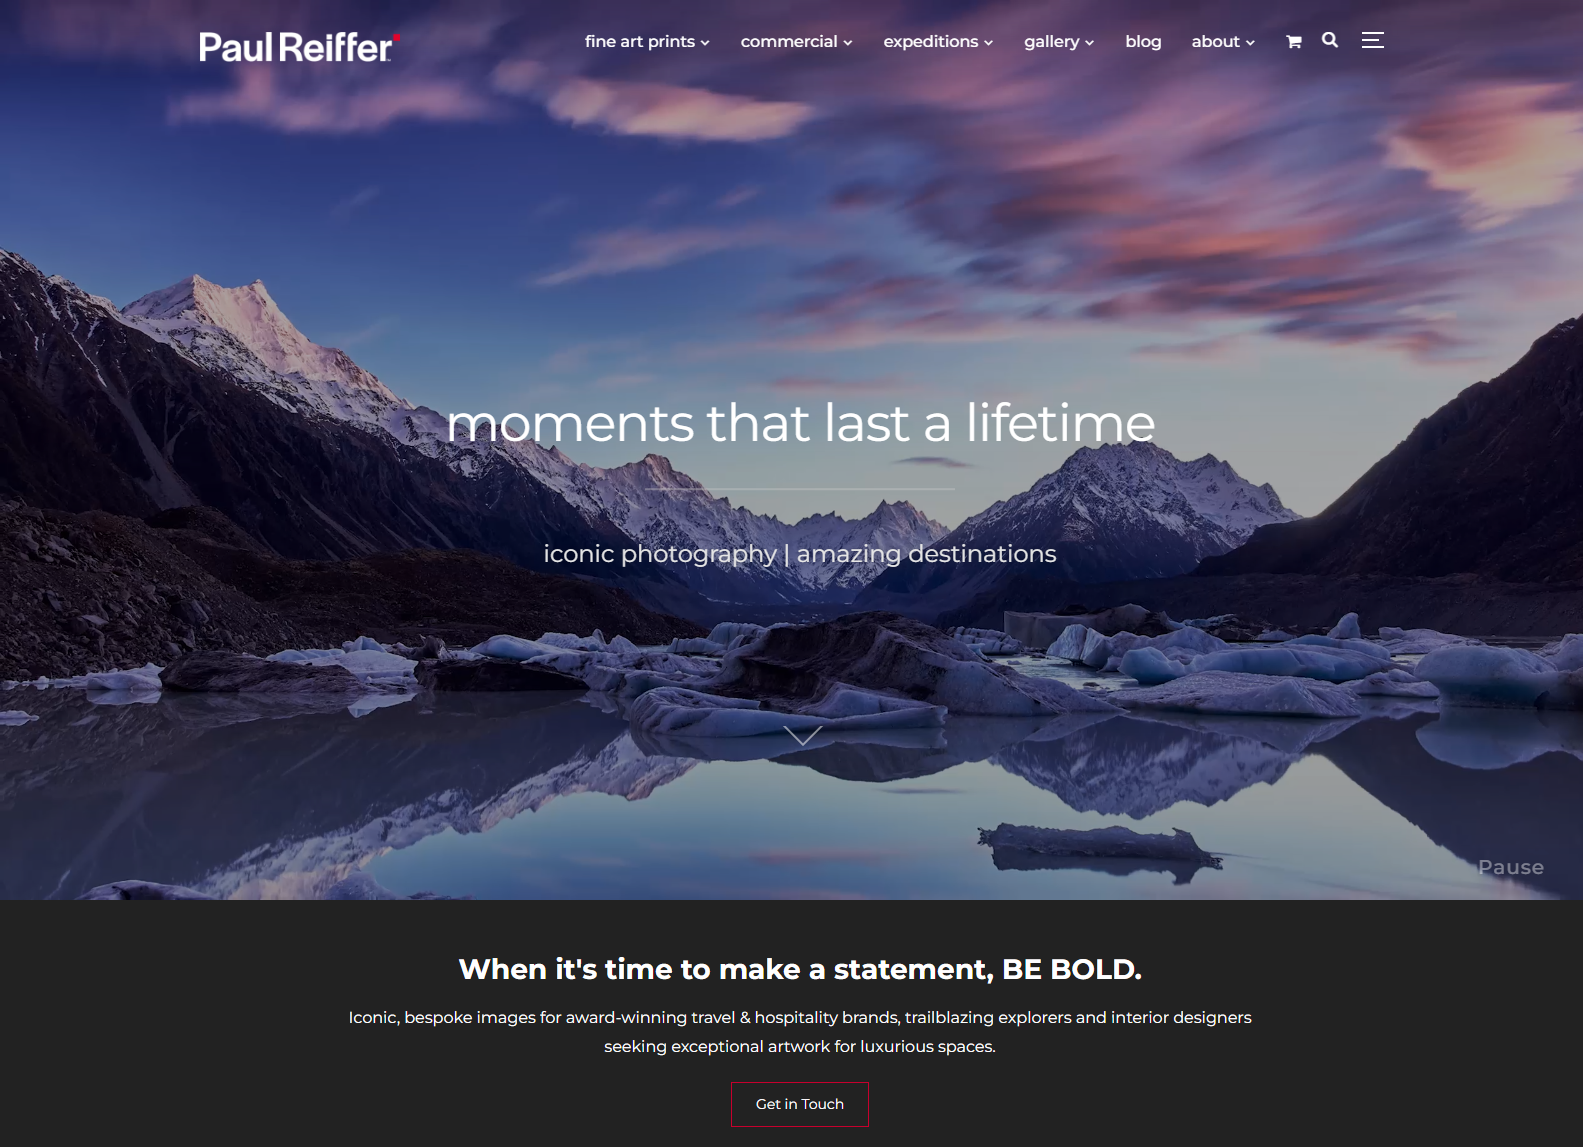
#1. Paul Reiffer
Paul Reiffer is a photography website that uses the Inspiro Premium theme.
#2. Nomadikas
Nomadikas is a travel and lifestyle brand that uses the Inspiro PRO theme.
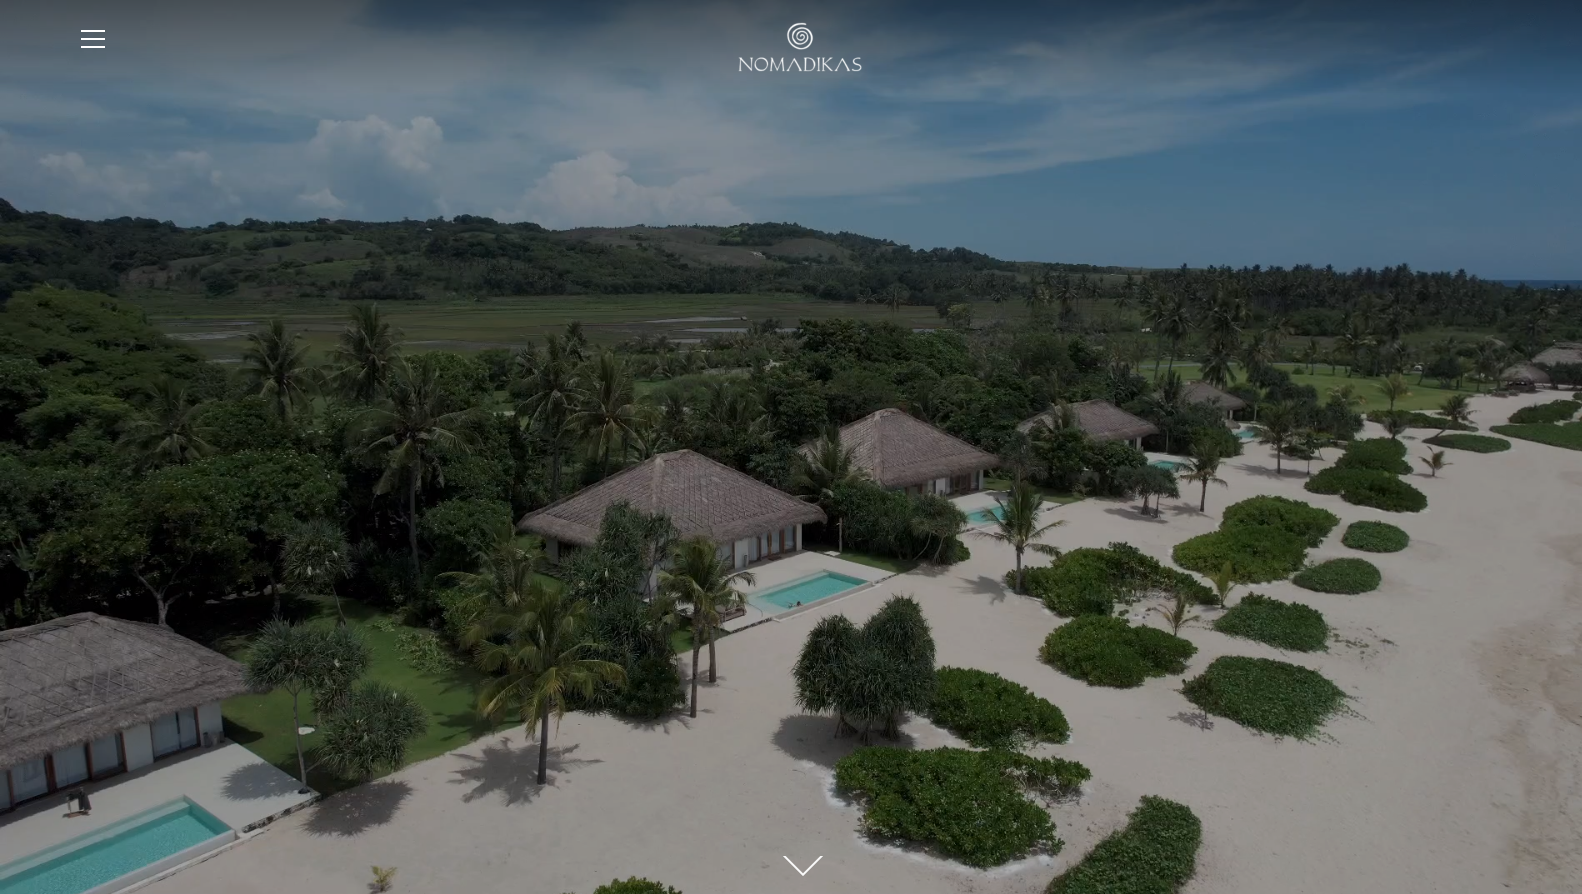
By using your brand’s unique video footage, you can give site visitors a quick “tour” of your brand and introduce your products or services.
Bottom Line
Adding a video background to your WordPress site’s homepage helps boost traffic and encourage users to browse your site for longer. Video elements also reduce the bounce rate on your site and increase dwell time, as they make it easier for you to grab users’ attention right away and convince them to keep browsing.
The most accessible and code-free methods of adding a video background in WordPress are the following:
- Through a WordPress theme: This allows you to have all the necessary video background features without installing additional plugins.
- Using the Cover block: It’s the easiest method, and it’s very easy to implement on any website using the block editor; the customization options are limited, though, and it supports only self-hosted videos.
- With a video background plugin: It’s a great free option for those who need more control over their video backgrounds.
- Using a page builder: This method offers the most flexibility in where to add the video background in the page layout.
Ready to add a video background feature to your WordPress site? We recommend choosing the WordPress theme option and the Inspiro PRO theme in particular.


