Changing your WordPress theme can significantly enhance your website’s appearance and functionality. However, it’s crucial to approach this process methodically to avoid potential issues like broken layouts or lost content.
In this guide, you’ll learn how to change a WordPress theme step-by-step, ensuring a smooth transition while preserving your site’s content and performance. Follow our expert tips to make your theme change seamless and trouble-free.
Table of Contents
- Understanding the Risks: A Thoughtful Approach to WordPress Theme Changes
- Getting Ready: Steps Before Switching WordPress Themes
- How to Change your WordPress Theme: Step-by-Step
Understanding the Risks: Ensuring a Smooth WordPress Theme Change
Switching your WordPress theme is more than a simple cosmetic update; it’s a significant change that can affect your site’s appearance, functionality, and user experience. Being aware of the potential risks and preparing for them can help you avoid common pitfalls.
Potential Issues
- Broken Layouts: Changing themes can disrupt your site’s layout, leading to broken or misaligned elements.
- Missing Functionality: Features and functions available in your old theme might not be present in the new one.
- Loss of Content: Custom content such as widgets, shortcodes, or theme-specific post types might not transfer seamlessly.
Risks for Customized Sites
If your current theme has been heavily customized with additional code, unique plugins, or specific custom widgets, the risks are even higher. A new theme may not align seamlessly with these customizations, leading to potential issues like:
- Compatibility Problems: Custom code and plugins may not work well with the new theme’s structure.
- Style Discrepancies: Custom CSS may need adjustments to fit the new theme’s design.
- Function Loss: Custom functionalities built into the old theme may not be supported by the new theme.
By taking a thoughtful and methodical approach, you can minimize disruptions and ensure your website remains functional and appealing after the theme change.
Preparing for a WordPress Theme Change: Essential Steps
Before you switch your WordPress theme, proper preparation is crucial to ensure a smooth and trouble-free transition. Follow these detailed steps to get ready:
1. Choose the Right Theme
Selecting the right WordPress theme is crucial for your site’s design, functionality, and user experience.
- Ensure the new theme aligns with your website’s desired look and functional requirements. Consider the design, layout options, and built-in features.
- Verify that the theme is compatible with your WordPress version and PHP version. Incompatible themes can cause errors and malfunctions.
- Check user reviews for insights into the theme’s reliability and potential issues. Ensure the theme is well-supported with regular updates and responsive support from the developers.
- Explore the theme’s demo site to understand its capabilities. Review the documentation to ensure it meets your needs and to familiarize yourself with its features and setup process.
2. Keep Track of Customizations
Maintaining a record of all customizations ensures that you can reapply them to your new theme without losing any important modifications.
- List all custom code snippets, custom CSS, sidebar modifications, and widget areas in your current theme. This includes any additional HTML, JavaScript, or PHP code.
- Copy any custom code to a secure document or text file. Organize it clearly, indicating where each piece of code should be applied in the new theme.
- Identify any plugins heavily integrated with your current theme. Ensure they will function correctly with the new theme or find suitable replacements if necessary.
3. Back Up Everything
Creating a full backup of your site, provides a safety net in case anything goes wrong during the theme change. Use a reliable backup plugin like UpdraftPlus, Duplicator, or WP STAGING to create a full backup of your entire website, including the database, WordPress files, themes, plugins, and uploads.
4. Set Up a Staging Environment
A staging environment is a replica of your live website where you can safely test changes before applying them to your actual site. This allows you to experiment with new themes, plugins, and customizations without affecting your site’s functionality or user experience.
Use a staging environment to create a clone of your live website. In the staging environment, test the new theme thoroughly. Make all necessary adjustments and ensure that all functionalities work as expected.
Plugins like WP STAGING, or hosting services that offer staging environments, can simplify the process of setting up and managing a staging site.
5. Evaluate Theme Performance
Test your current theme’s performance using tools like Google PageSpeed Insights or GTmetrix. Record metrics such as page load time, mobile performance, and overall speed score.
Use these benchmarks to compare performance after implementing the new theme. Ensure the new theme meets or exceeds your current standards. Pay attention to loading times, responsiveness, and overall user experience.
If the new theme negatively impacts performance, look into optimization techniques.
How to Change your WordPress Theme: Step-by-Step
Follow these detailed steps to make this transition smoothly and effectively:
1. Enable Maintenance Mode
Enabling maintenance mode prevents your visitors from experiencing a broken or unfinished site during the theme change. It displays a user-friendly notice, letting them know that your site is temporarily down for maintenance. To do this, you can use plugins specifically designed for enabling maintenance mode.
Go to your WordPress dashboard, navigate to Plugins > Add New, and search for maintenance mode plugins such as LightStart or Website Builder. Once installed, activate the plugin.
Go to the plugin’s settings and configure the message that visitors will see. Customize it with your branding and a brief explanation of the maintenance.
2. Add the New Theme to Your WordPress
This process involves either selecting a theme from the WordPress theme repository or uploading a theme you’ve purchased or downloaded.
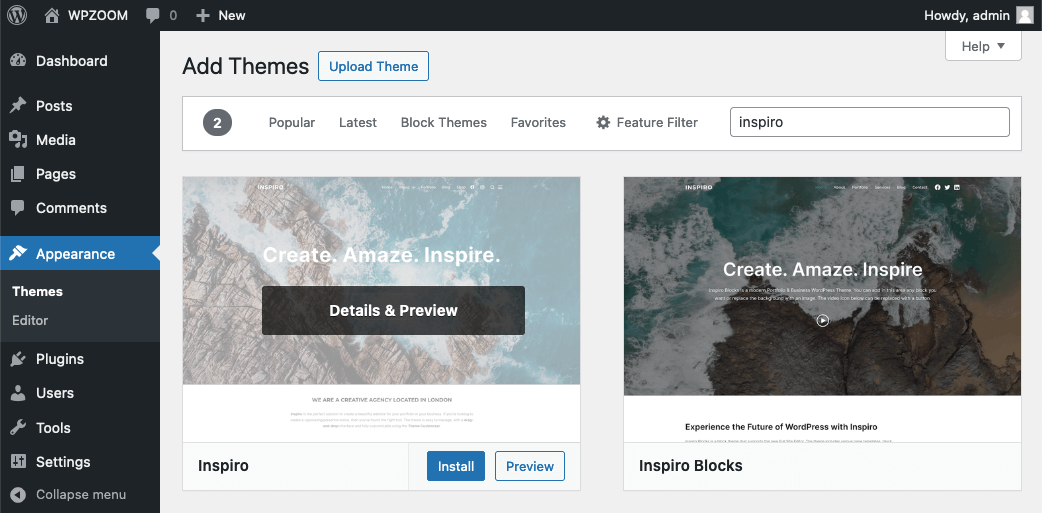
Navigate to your WordPress dashboard, then go to Appearance > Themes.
Click the Add New button at the top of the page.

You can browse through the available themes or use the search bar to find a specific theme.
When you find the theme you want, click Install.

If you’re uploading a theme, click Upload Theme, choose the zip file of your theme, and then click Install Now.

For more detailed guidance, refer to our article about how to install a WordPress theme.
3. Preview the New Theme
Before activating the new theme, it’s a good idea to preview how it will look with your existing content. This step helps you identify any immediate issues and make necessary adjustments before going live.
After installing the new theme, hover over the theme’s thumbnail image and click the Details & Preview button. This will open the WordPress Customizer, allowing you to see your site with the new theme applied.
Use the Customizer to adjust elements such as the logo, colors, and fonts to better fit your brand. This provides a real-time preview of changes and ensures the new theme integrates well with your existing content.
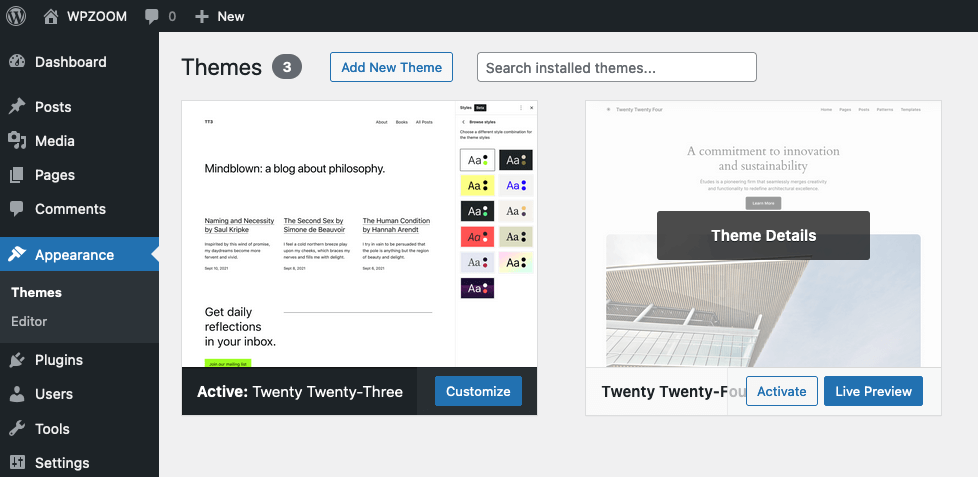
You can always preview a theme from Appearance > Themes, by hovering over an inactive theme and clicking Live Preview.
4. Activate Your Theme
Once you are satisfied with the preview and have made any necessary adjustments, the next step is to activate your new theme. Activating the theme applies it to your live site.
Go to Appearance > Themes in your WordPress dashboard. Hover over the new theme’s thumbnail and click the Activate button.
Immediately after activation, visit your website to ensure everything looks and functions correctly. Pay attention to the layout, navigation, and key functionalities.
5. Customize the Theme and Re-add Custom Code
After activating your new theme, it’s time to tailor it to match your preferences and re-integrate any custom code or modifications from your previous theme.
- Customize the Theme: Navigate to Appearance > Customize to access the WordPress Customizer. Adjust settings like colors, fonts, header images, and other design elements to align with your branding.
- Re-add Custom Code: Apply any custom code snippets, custom CSS, and other modifications you previously saved. This might include adding tracking codes, custom widgets, or specific layout adjustments.
Custom CSS: Add your saved custom CSS under Additional CSS in the Customizer or through a custom CSS plugin.
Functions and Snippets: Add any PHP code snippets to your theme’s functions.php file or a site-specific plugin.
Widgets and Sidebar Customizations: Re-create or restore any custom widgets and sidebar configurations.
For guidance on customizing your new WordPress theme, refer to our article about how to customize a WordPress theme.
6. Check Functionality and Resolve Issues
After customizing your new theme, it’s essential to thoroughly test your website to ensure that everything works as expected and resolve any issues that arise.
- Test Core Features: Navigate through your site to ensure that all core features, such as navigation menus, contact forms, and e-commerce functions, are working properly.
- Check for Broken Links: Verify that all internal and external links are functioning correctly.
- Verify Plugin Compatibility: Ensure that all your essential plugins are working seamlessly with the new theme. Look for any visual or functional discrepancies.
- Fix Layout Issues: If you notice any broken layouts or design elements that don’t look right, make the necessary adjustments through the Customizer or theme settings.
7. Test the New Theme’s Performance
Compare the new theme’s performance to your previous benchmarks. Assess how the new theme affects your site’s user experience. Pay attention to loading times, responsiveness, and ease of navigation. If the new theme slows down your site, implement performance optimizations.
8. Remove Unnecessary or Duplicate Plugins
After switching to a new theme, you may find that some plugins are no longer needed or have become redundant. Removing these can improve your site’s performance and reduce potential conflicts.
9. Turn Off Maintenance Mode
Once you have confirmed that your new theme is working correctly and all functionalities are intact, it’s time to turn off maintenance mode and make your site accessible to visitors again.
- Disable Maintenance Mode: Go to the settings of your maintenance mode plugin and turn off maintenance mode. This will remove the maintenance message and restore full access to your site for visitors.
- Verify Site Accessibility: Check your site from a visitor’s perspective to ensure that it is fully accessible and functioning as expected.
10. Let Users Know About the New Theme
Informing your audience about the new theme is a good practice. It not only keeps them updated but also helps in getting feedback on any issues they might encounter. This can be done through a blog post, newsletter, or social media announcement.
Encourage users to report any issues they encounter or share their thoughts on the new design. This feedback can be invaluable for making further improvements.
Bottom Line
Switching your WordPress theme is more than just a cosmetic update; it’s a strategic move that can significantly impact your website’s functionality and user experience. By following these detailed steps, you can ensure a smooth and trouble-free transition, preserving your content and maintaining your site’s performance.
For more insights and tips on managing your WordPress themes, check out these additional resources from our blog:
- How to Choose a WordPress Theme
- How to Customize Your WordPress Theme
- How to Create a WordPress Child Theme
- How to Create a Custom Theme in WordPress
By taking a methodical and informed approach, you can enhance your website’s appeal and functionality, ensuring it continues to meet the evolving needs of your audience and your business.


