Boost your WordPress site’s security, trustworthiness, and SEO with one simple addition: an SSL certificate. It’s not just about encryption; it’s about showing your visitors that you care about their safety and making sure your site ranks higher on search engines.
In this guide, we’ll explore how to acquire and install an SSL certificate on your WordPress site. With our step-by-step instructions, you’ll quickly enhance your site’s performance and credibility. Ready to make your site safer and more successful? Let’s get started!
Table of Contents
- How to Obtain an SSL Certificate for Your WordPress Site
- Install an SSL Certificate on WordPress Using Your Web Host
- Add an SSL Certificate to WordPress Using a Plugin
- Install SSL on WordPress Manually
- Configuring WordPress to Use HTTPS
- Troubleshooting Common WordPress SSL Issues
How to Obtain an SSL Certificate for Your WordPress Site
Securing your WordPress site with an SSL certificate is easier than you might think! There are a few different paths you can take to get your SSL certificate, each with its own set of benefits. Let’s explore your options:
Option 1: Get an SSL Certificate Through Your Hosting Provider
The simplest and often most cost-effective way to get an SSL certificate is through your hosting provider. Many hosts include free SSL certificates in their packages, making this option a no-brainer. Some even offer premium SSL options, perfect for WordPress sites that need extra security, such as EV (Extended Validation) certificates.
Start by checking if your hosting provider supports SSL and what options they offer. This route is great for most users because it’s straightforward and integrated into your hosting service.
Option 2: Get a Free SSL Certificate from Let’s Encrypt
Looking for a budget-friendly option? Let’s Encrypt has got you covered! This free, automated, and open Certificate Authority offers SSL certificates that are perfect for small to medium-sized websites, blogs, and personal projects.
The primary benefit here is cost-effectiveness—no need to spend on premium certificates if basic security meets your needs. Plus, Let’s Encrypt certificates are widely supported and trusted, ensuring your site’s data is secure without breaking the bank.
Option 3: Purchase an SSL Certificate from Certificate Authorities (CAs)
For websites that handle sensitive information, such as e-commerce sites or platforms dealing with personal data, investing in a premium SSL certificate from a reputable Certificate Authority (CA) like Sectigo or DigiCert is a wise choice. These certificates provide a higher level of validation and security, which is crucial for maintaining trust and compliance.
Premium SSL certificates come with features like extended validation, warranty protection, and customer support, making them ideal for businesses that prioritize security.
Choosing the Right SSL Certificate
When deciding on an SSL certificate, consider the level of security your website needs. Here’s a quick rundown:
- Basic SSL Certificates: Ideal for personal blogs and small websites.
- Wildcard SSL Certificates: Perfect if you have multiple subdomains.
- EV SSL Certificates: Best for e-commerce sites and businesses handling sensitive data.
Each type of certificate serves a different purpose, so pick the one that best fits your site’s requirements.
Now that you’ve acquired your SSL certificate, it’s time to get it up and running on your WordPress site. There are several methods you can use, each suited to different levels of technical expertise and convenience:
- Using Your Web Host
- Using a Plugin
- Manual Installation
Each method has its advantages, so choose the one that best fits your comfort level and needs.
Install an SSL Certificate on WordPress Using Your Web Host
Installing an SSL certificate on your WordPress site using your web host is a breeze! Most hosting providers offer tools and assistance to make the process seamless. Here’s a step-by-step guide to help you through it, focusing on cPanel, one of the most common web hosting management tools:
- Access Your Hosting Control Panel: First, log in to your hosting account and navigate to the control panel provided by your host. This is often cPanel, but some hosts might have custom control panels.
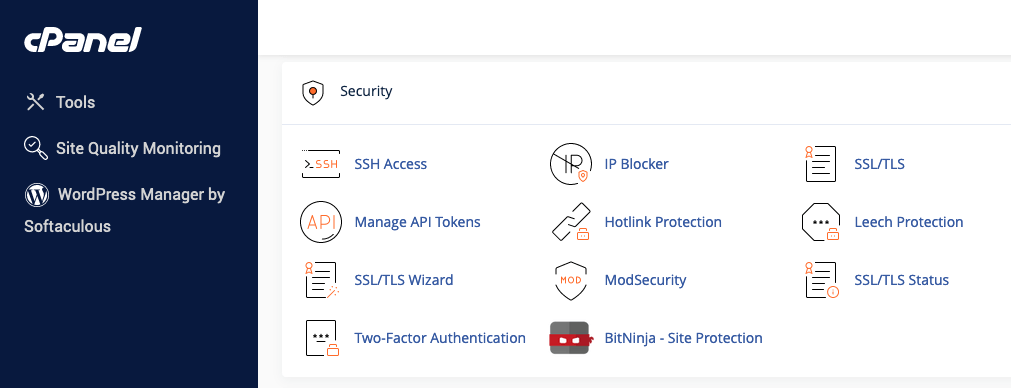
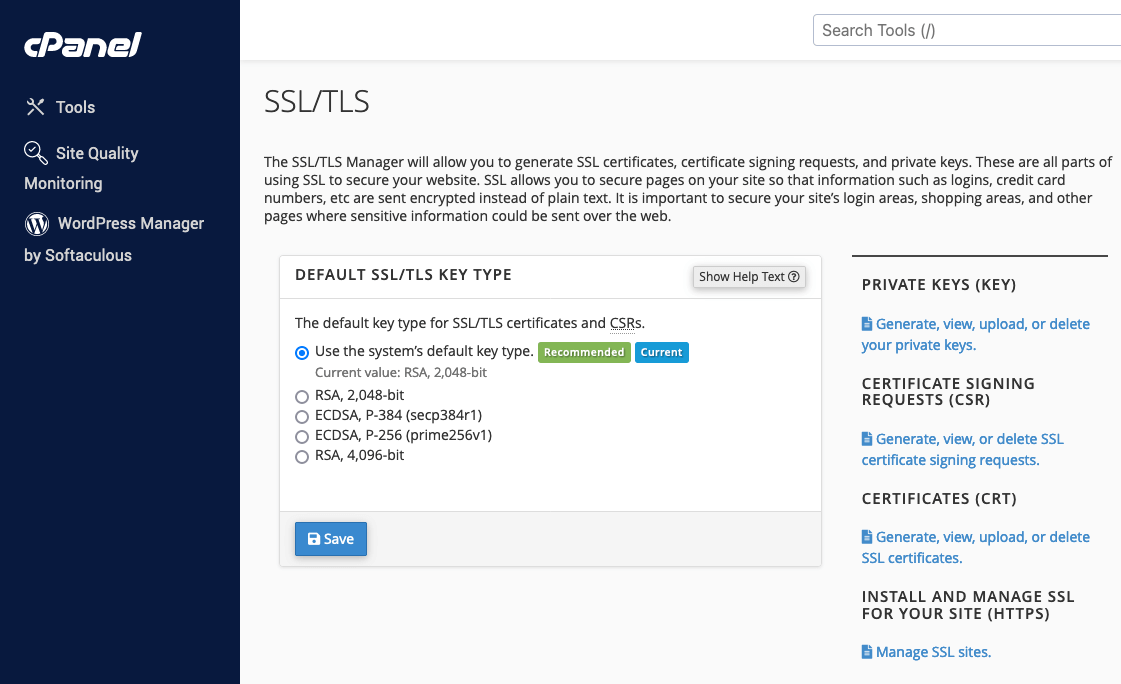
- Locate the SSL/TLS Manager: Within your control panel, look for the Security section or directly for an SSL/TLS manager. This tool manages keys, certificates, and signing requests related to SSL. If you’re using cPanel, you’ll typically find it under the Security section.
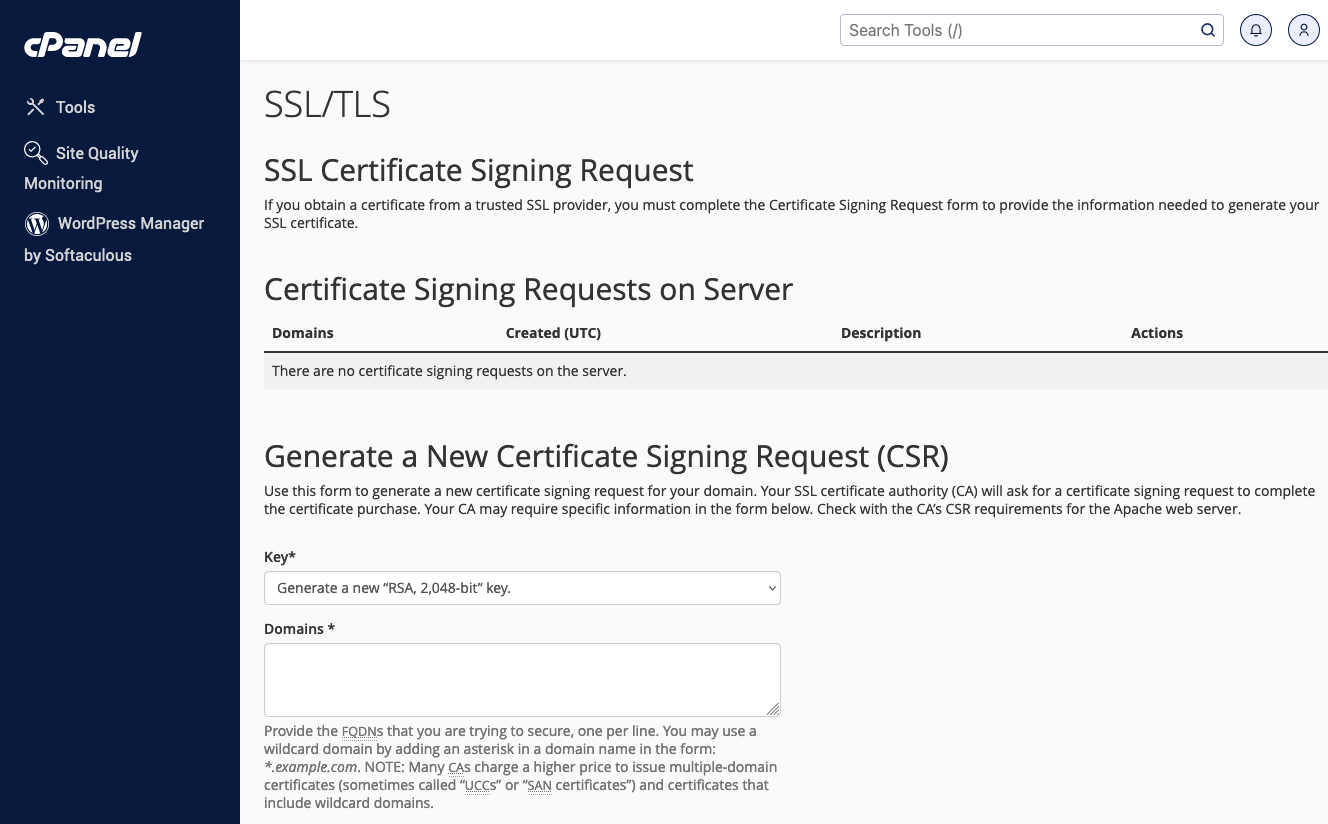
- Generate a Certificate Signing Request (CSR): Before installing your SSL certificate, you might need to generate a CSR if you haven’t done so during the certificate acquisition process. The CSR is required by the Certificate Authority (CA) to create your SSL certificate. In cPanel, you can generate a CSR through the SSL/TLS manager.
Fill in your domain and company details. - Activate Your SSL Certificate: If you obtained your SSL certificate through your hosting provider, activation might be automatic. If not, you may need to manually activate it by entering a code or through a verification email sent by the CA.
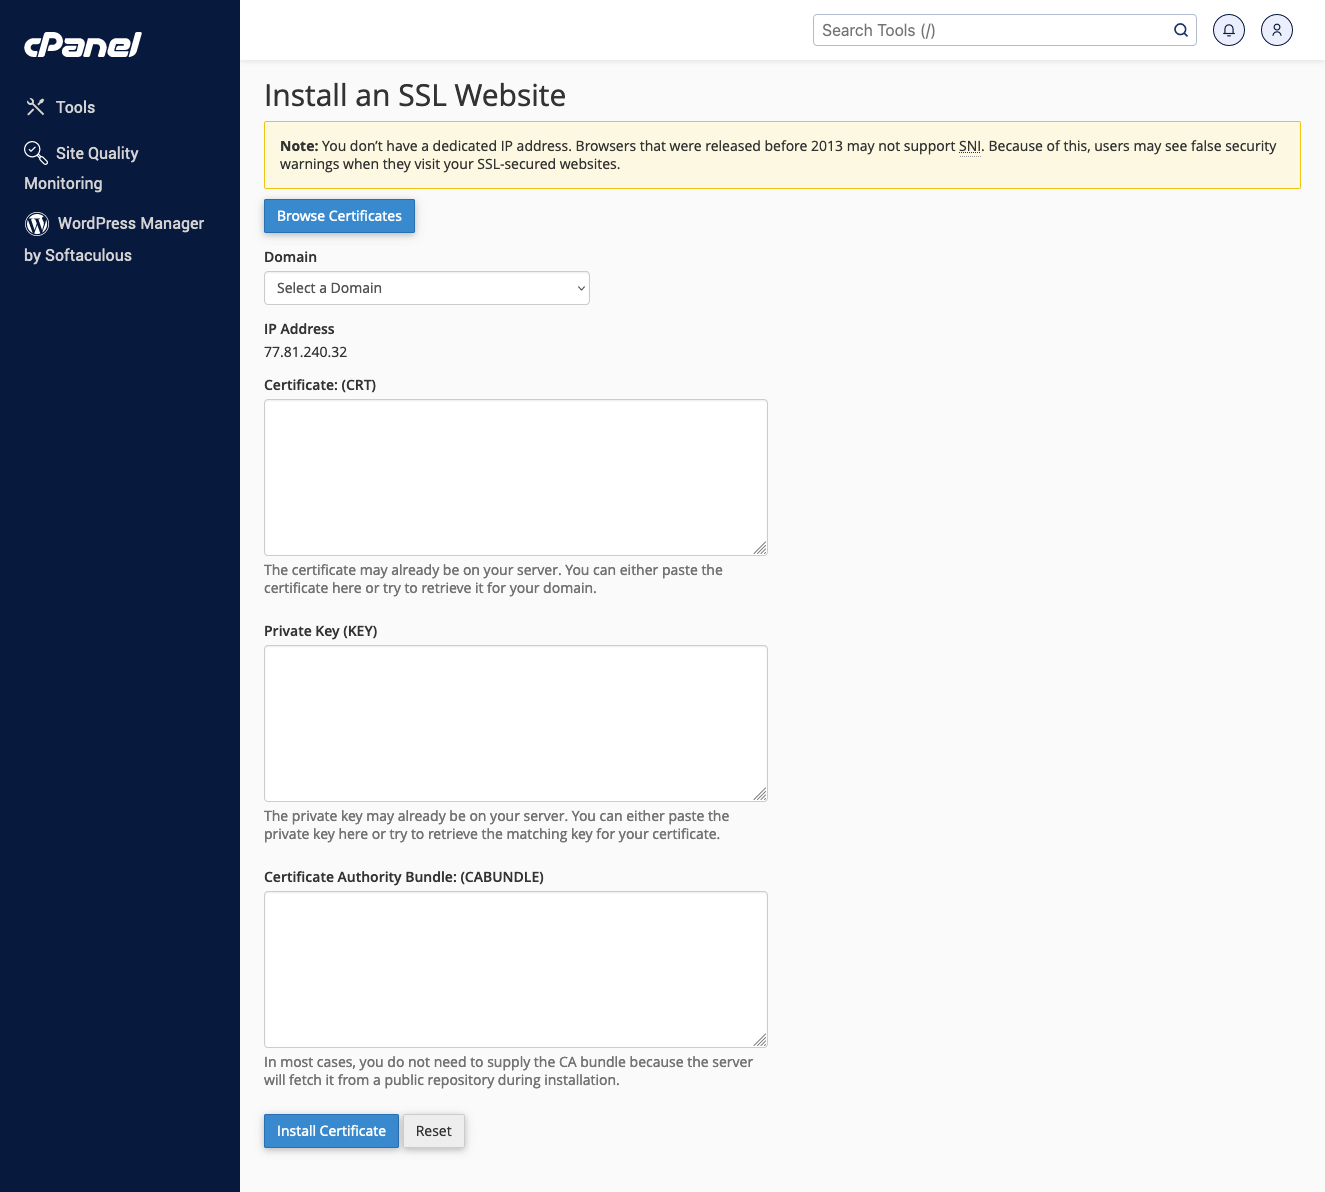
- Upload Your SSL Certificate: Once your SSL certificate is ready, upload it to your hosting account. In cPanel, navigate to the SSL/TLS manager and select Manage SSL sites under Install and Manage SSL for your site (HTTPS). From there, you can copy and paste your SSL certificate files into the provided fields, including any CA bundle that came with it.
- Update Your Domain Settings: After uploading the certificate, you need to specify which domain it should be applied to. Select your domain from the dropdown menu and ensure the system correctly fills in the necessary fields (certificate, private key, and CA bundle).
Once everything is in place, click Install Certificate or the equivalent button in your control panel.
And that’s it! Your WordPress site is now equipped with an SSL certificate. If you encounter any issues, don’t hesitate to reach out to your hosting provider’s support team for assistance.
Add an SSL Certificate to WordPress Using a Plugin
If you’re looking for a hassle-free way to add SSL to your WordPress site, using a plugin is the perfect solution. Plugins like Really Simple SSL simplify the process by handling most of the technical work for you. Here’s a step-by-step guide to getting your site secure with an SSL plugin:
- Ensure Your Hosting Environment is SSL Ready: Before you start, make sure your hosting provider has enabled SSL for your site and installed an SSL certificate on your server. If you’re unsure, contact your hosting provider to confirm that your site is SSL-ready.
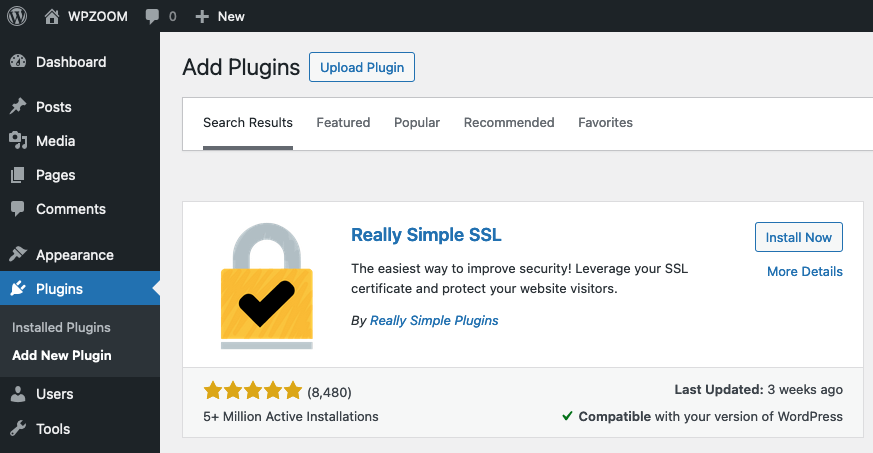
- Install the Really Simple SSL Plugin.
Navigate to your WordPress dashboard, go to the Plugins section, and click Add New Plugin.
In the search bar, type “Really Simple SSL” and look for the plugin in the repository.
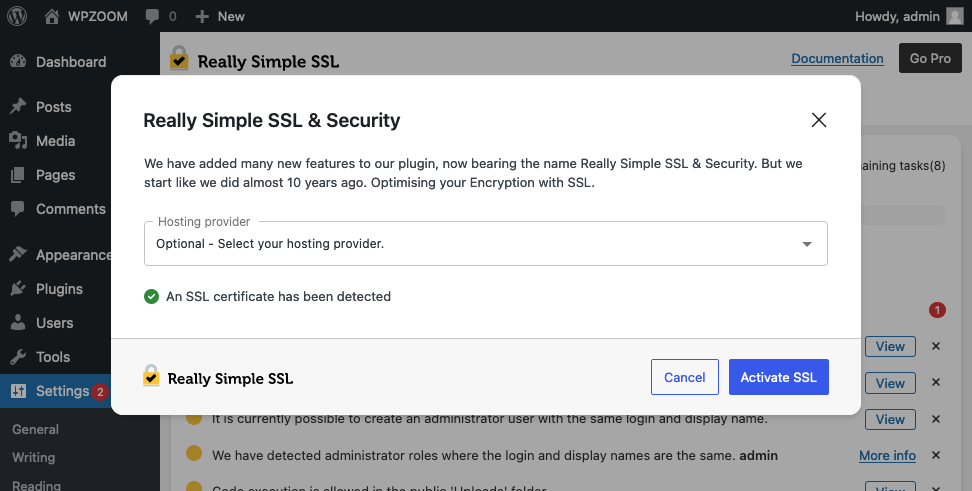
Click Install Now and then Activate once the installation is complete. - Run the SSL Check: After activation, Really Simple SSL will automatically detect your WordPress SSL certificate. The plugin will run a quick check to ensure everything is in place. If any issues are detected, the plugin will provide recommendations to fix them.
- Activate SSL with One Click: Press the Activate SSL button. The plugin will make the necessary adjustments to your site’s configuration to enforce HTTPS. This includes updating your site URLs and setting up redirects from HTTP to HTTPS.
Install SSL on WordPress Manually (Not Recommended for Beginners)
For those who prefer a hands-on approach and have technical expertise, manually installing an SSL certificate on your WordPress site offers complete control over the process. However, be aware that this method involves interacting with server configurations and command-line interfaces, which can be complex and intimidating for beginners.
If you’re comfortable with server administration tasks, here’s a simplified overview of the manual installation process:
1. Generate a Certificate Signing Request (CSR): A CSR is a request you send to a Certificate Authority (CA) to obtain your SSL certificate. You’ll need to provide information about your website and organization. This step is typically done via your server’s command line interface or your hosting control panel.
Example command for generating a CSR on Apache:
openssl req -new -newkey rsa:2048 -nodes -keyout your_domain.key -out your_domain.csrFill in your domain and company details as prompted.
2. Submit the CSR to a Certificate Authority: Choose a reputable CA and submit your CSR to them. The CA will validate your request and issue your SSL certificate. This process may involve domain validation through email or other methods.
3. Install Your SSL Certificate on Your Server:
Once you receive your SSL certificate from the CA, you’ll need to install it on your server. Access your server’s configuration files and place your certificate in the appropriate directory.
Update your server’s configuration to reference the new certificate.
4. Restart your Apache server to apply the changes.
While manual installation provides full control over your SSL setup, it’s essential to proceed with caution to avoid potential pitfalls. If you’re uncertain about any steps, consider using your web host’s control panel or an SSL plugin for a more user-friendly experience.
Configuring WordPress to Use HTTPS
Once you have successfully installed an SSL certificate on your WordPress site, the next crucial step is to configure WordPress to use HTTPS for all connections. This ensures that all data transmitted between your site and its visitors is encrypted, enhancing security and building user trust.
Update WordPress Address (URL) and Site Address (URL)
- Log in to your WordPress dashboard.
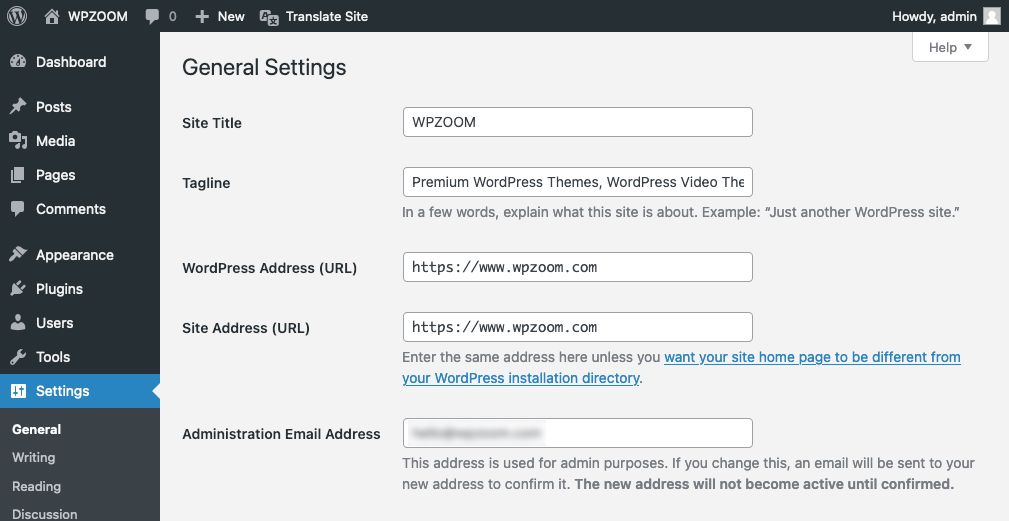
- Navigate to Settings > General.
You will see two fields: WordPress Address (URL) and Site Address (URL). Change both URLs from http:// to https:// by adding the ‘s’ to the http.
For example, change http://www.wpzoom.com to https://www.wpzoom.com. - Scroll down and click the Save Changes button.
- WordPress will log you out automatically. Log back in using the new HTTPS URL.
Update Your .htaccess File for Redirects
To ensure all traffic is redirected to HTTPS, you need to update your .htaccess file.
1. Access your .htaccess file via your hosting control panel or using an FTP client.
2. Add the following lines to your .htaccess file to redirect all HTTP traffic to HTTPS:
<IfModule mod_rewrite.c>
RewriteEngine On
RewriteCond %{HTTPS} off
RewriteRule ^(.*)$ https://%{HTTP_HOST}%{REQUEST_URI} [L,R=301]
</IfModule>
3. Save the changes and upload the updated .htaccess file to your server.
By following these steps, you’ll ensure that your WordPress site fully utilizes HTTPS, providing a secure and trustworthy experience for your visitors.
Troubleshooting Common WordPress SSL Issues
Transitioning your WordPress site to HTTPS is a crucial step for security, but sometimes issues can arise. Here’s how to troubleshoot some of the most common SSL-related problems you might encounter:
Mixed Content Warnings
Mixed content warnings occur when a webpage served over HTTPS loads resources (like images, videos, stylesheets, or scripts) over an unsecured HTTP connection. These warnings can undermine the security of your SSL certificate and cause browsers to display security alerts to users.
How to Fix Mixed Content Warnings:
- Use a Plugin: Plugins like Really Simple SSL can automatically detect and fix mixed content by rewriting HTTP URLs to HTTPS.
- Manually Search and Replace: Use a plugin like Better Search Replace to search your WordPress database for http:// and replace it with https://. Make sure to target resources hosted on your domain to avoid unintentional changes.
- Check Your Theme and Plugins: Sometimes, the issue stems from hardcoded HTTP links within your theme or plugins. Inspect the source code of your theme and plugins and update any HTTP links to HTTPS.
SSL Certificate Not Trusted
This error appears when a browser does not recognize the Certificate Authority (CA) that issued your SSL certificate or the certificate has been improperly installed.
How to Fix SSL Certificate Not Trusted Errors:
- Verify Your SSL Installation: Use tools like Qualys SSL Labs to check your certificate’s installation. This tool can identify issues like missing intermediate certificates.
- Consult Your Hosting Provider: If you’re unsure how to correct the issue, your hosting provider can verify that the SSL certificate is installed correctly and help resolve any problems.
Enforcing HTTPS Throughout Your Site
Even after installing an SSL certificate and updating your site settings, some users might still access your site via HTTP. This situation can occur if your site’s links and redirects are not properly configured to use the HTTPS protocol.
Here is how to enforce HTTPS:
1. Implement HTTP to HTTPS Redirects:
Edit your .htaccess file (for Apache servers) or your server configuration (for Nginx servers) to redirect all HTTP requests to HTTPS.
For Apache, add the following to your .htaccess file:
RewriteEngine On
RewriteCond %{HTTPS} off
RewriteRule ^(.*)$ https://%{HTTP_HOST}%{REQUEST_URI} [L,R=301]
For Nginx, add the following to your server configuration:
server {
listen 80;
server_name yourdomain.com;
return 301 https://$host$request_uri;
}
2. Update Internal Links and Resources: Ensure all internal links and resources within your site’s content use HTTPS to prevent security warnings and ensure a seamless user experience.
Bottom Line
Successfully transitioning your WordPress site from HTTP to HTTPS is a significant step towards securing your website and building trust with your visitors. By troubleshooting common SSL issues and ensuring proper configuration, you can maintain a secure and reliable site. Regularly monitor your site for SSL-related warnings or errors and stay proactive in addressing any issues that arise.
For further reading and to enhance your WordPress site’s security and SEO performance, consider exploring these comprehensive guides:
- Essential WordPress Security Guide: Dive deeper into best practices for securing your WordPress site, covering everything from basic precautions to advanced security measures.
- WordPress SEO Like a Pro: Best Practices Guide: Elevate your site’s search engine rankings with our expert guide on WordPress SEO.
